Grilled Cheese Biscuit Bites
What do you get when you cross flakey, buttery biscuits with gooey, melty grilled cheese? These grilled cheese biscuit bites.
Grilled cheese sandwiches are one of the most comforting foods out there, and they’re quite easy to make. I don’t know about you, but they were a staple in my diet as a child.
So, why make them more complicated by baking them?
Because everything is better in bite form.
If you want an easy appetizer or snack to impress your next guests, look no further than these grilled cheese biscuit bites!
How to make grilled cheese biscuit bites

If you’ve made my Apple Cobbler with Sweet Biscuits or Soft Pretzel Biscuits, this recipe is going to look quite similar.
If you haven’t made them… what are you waiting for?!
I’m just kidding, I won’t hold it against you. But after you make these grilled cheese biscuit bites, you’re probably going to want to check those out, too.

These grilled cheese biscuit bites could not be easier. We just need to mix up all of our ingredients to form a nice big ball of dough.
The dough is going to be a little bit wet because we’re bumping up the butter slightly (trust me on this one) so make sure you use some extra flour on the surface and on your hands to make it easier on you.

The next step is separating the dough into 12 smaller balls and flattening them out.
You could certainly make smaller sized grilled cheese biscuit bites if you wanted a larger quantity, but I found these to be a great size.
Technically each one of more than one bite, but we’ll count it.

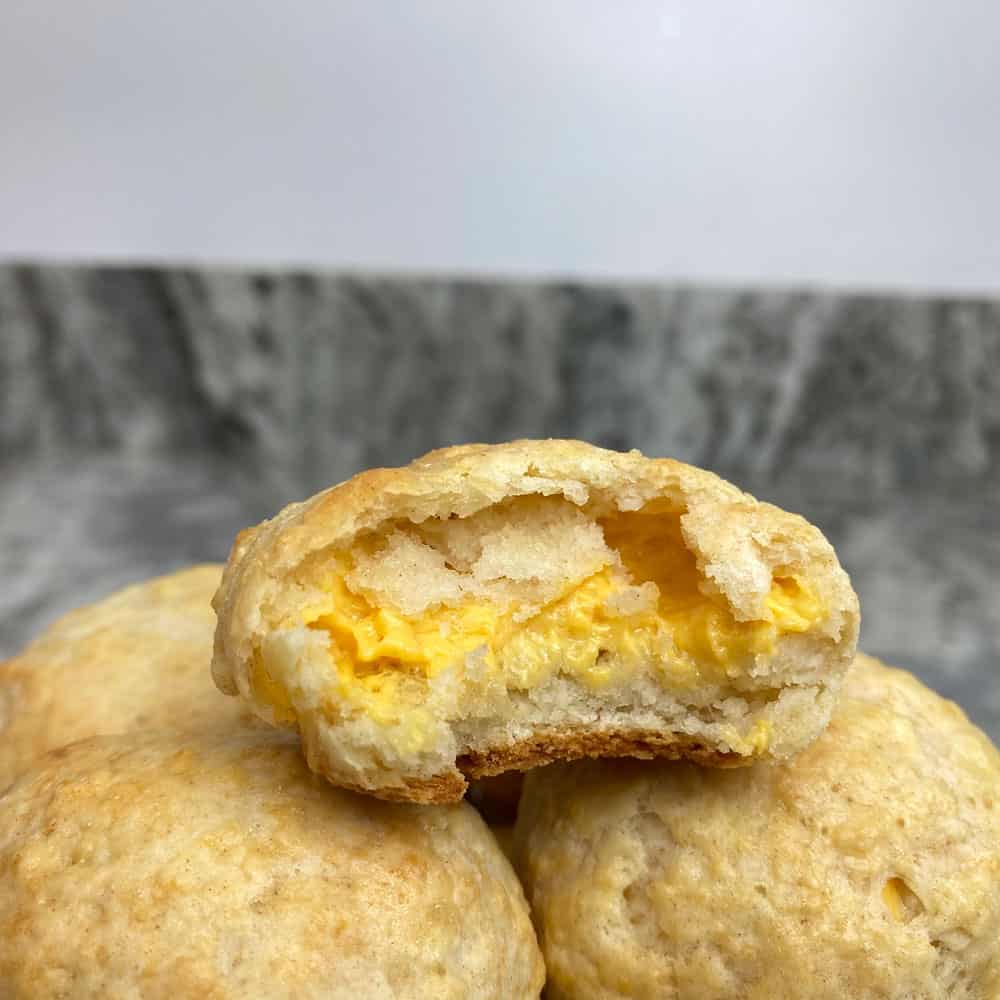
Then, we’re going to take our American cheese and break it apart so it fits in the middle of the dough.
This step is critical- if we were to just lay a slice of cheese right on top, we wouldn’t be able to close the bites up.
You can use as much cheese as you want here, but try not to get too aggressive with it. I used roughly half of a slice for each grilled cheese biscuit bite, and it was a good amount. Any more than that, and I’m not sure the cheese would have stayed within each bite.

As you can see, we need to leave room around the cheese to be able to roll the sides up.
Since the dough is wet, it is quite easy to work with, and we’re able to easily pinch the top to close it up. Make sure the entire thing is closed up and there are no openings or else the cheese will ooze out while baking!

Then, all that’s left to do is place them with the pinched side down on a baking sheet. We want the pinched side down to make sure it stays closed- if we left the pinched side on the top, the grilled cheese biscuit bites would be prone to opening up.
We’re going to hit these with a quick egg wash to help with the browning, bake, and then we’re ready to go!

Main ingredients used and possible substitutions
These grilled cheese biscuit bites don’t require a ton of ingredients, but the ones chosen are important. Let’s explore a few possible substitutions.
Fat-Free American Cheese

For me, a classic grilled cheese is made with American cheese, so I stuck with that route for these grilled cheese biscuit bites. I use fat-free to save some calories because I truly cannot taste the difference, but you have full freedom to choose whatever cheese you like best! Get creative with it, or keep it classic like I did.
All-Purpose Flour
You can likely get away with using a gluten-free flour as long as it is a 1:1 substitution. However, flour is critical here to create the dough structure! Because of that, you won’t be able to swap it out for oat flour, almond flour, or coconut flour.
Buttery Spread/Light Butter
We want these grilled cheese biscuit bites to be buttery and flakey, so obviously, butter is important! But the type you use can definitely vary.
I use “Country Crock” which is just a buttery spread with 50 calories per tablespoon. You can use full-fat butter, or any kind of vegan buttery spread. Coconut oil would likely work as well, but that won’t give us the butter flavor we want.
Sugar Substitute
The tiny bit of sweetener used in this recipe helps the structure of these bites. Regular sugar would work as well, but you can use any kind of granular sweetener you’d like! Just don’t try to use a liquid sweetener as it will mess with the consistency of the dough too much.
Plain Nonfat Greek Yogurt
As we’ve learned with the 2 Ingredient Protein Bagels and Breakfast Bagel Bombs, Greek yogurt is a truly magical ingredient. When mixed with flour and baked, it magically creates a bread-like texture. Because of this, it’s crucial in this recipe! You won’t be able to swap it out for regular yogurt, and I can’t promise if it will work with a dairy-free substitute.
Enjoying leftover grilled cheese biscuit bites

These are best right out of the oven (and paired with your favorite soup), so I recommend eating them fresh if you can! I mean, we want them to be melty and gooey, after all.
Once these cool, the cheese inside isn’t nearly as gooey. But, there’s an easy fix for that!
Simply throw these in the microwave for 5-10 seconds before eating and they’ll be good as new.
I stored these in the fridge to keep them fresh, then enjoyed them throughout the week and they held up great!
Grilled Cheese Biscuit Bites
Buttery, flakey biscuits meet melty & gooey grilled cheese in the ultimate healthy snack! Plus, each bite is only 80 calories and packs 5g of protein!
Ingredients
- 150g All-Purpose Flour
- 1 1/2 Tsp Baking Powder
- 120g Plain Nonfat Greek Yogurt
- 56g Light Butter / Buttery Spread
- 10g Granular Sugar Substitute
- 1/4 Tsp Salt
- 1/4 Tsp Garlic Powder
- 6 Slices Fat-Free American Cheese
- 1 Egg (for egg wash)
Instructions
- Preheat the oven to 350 degrees F
- Add the flour, baking powder, and seasonings to a large bowl, then mix those up.
- Add the Greek yogurt and mix together until it begins to form a light crumble.
- Spoon pieces of the buttery spread (or cut your butter) into the bowl so they are spread throughout and not just in one large piece. Use a silicone spatula to mix everything together until a dough forms.
- Remove onto a lightly floured surface and divide the dough into 12 roughly equal-sized pieces. You can eyeball it as they do not need to be exactly the same. If you want each bite to be the same size, you can weigh your entire ball of dough and divide that by 12 to get the exact weight that each should be.
- Sprinkle some additional flour on top of each ball to help prevent sticking, then flatten them out until you have small round circles.

- Break apart the American cheese and add it to the center of each circle. For mine, each bite used roughly half of a slice of cheese. Leave room around the edges to be able to close them up.
- Roll the edges up and pinch them at the top to fully close the cheese in and shape them into a ball.
- Place your grilled cheese biscuit bites with the pinched side down on a baking sheet.
- Whisk up an egg in a small ball, then lightly brush the tops of each bite to help create a nice golden brown on top. This is optional, but highly recommended!
- Bake for 25 minutes and enjoy fresh out of the oven!

Notes
- These are best served fresh with the cheese inside nice and melty. If you need to reheat these, 5-10 seconds in the microwave is all that is needed.
- I stored these in a container in the fridge and enjoyed them throughout the week, quickly reheating in the microwave prior to eating.
Nutrition Information
Yield 12 Bites Serving Size 1 Grilled Cheese BiteAmount Per Serving Calories 80Total Fat 2gCarbohydrates 11gProtein 5g

Thoughts on cooking in the air fryer?
Definitely going to include those on my next meal prep! A few of them at lunch with the rest of the meal would surely go very well! Thanks a lot!