35 Different Exercises You Can Do With Lever Arms
After building my own decent home gym, I’ve learned a thing or two about home-gym essentials.
There are the basic essentials, such as a bench, barbell, and weights, but then there are other pieces of equipment that I find insanely valuable.
In another post, I broke down my leg extension machine and all of the exercises I can do with it, and today I want to break down lever arms.
With a little creativity, you can easily replicate any machine in the gym with these simple rack accessories.
If you want to see all of the exercises in action, check out the full video below:
And also be sure to check out the new “hack” I came up with to make these lever arms function more like a machine in the gym!
Note: This post contains affiliate links for various pieces of equipment mentioned. Clicking those links adds no additional cost to you but earns me a very small commission.
- What Are Lever Arms?
- How To Use Lever Arms Safely
- Add-ons and Accessories for Lever Arms
- Chest Exercises To Do With Lever Arms
- Back Exercises To Do With Lever Arms
- Shoulder Exercises To Do With Lever Arms
- Leg Exercises To Do With Lever Arms
- Arm Exercises To Do With Lever Arms
- Final Thoughts: Are Lever Arms Necessary For Home Gyms?
What Are Lever Arms?
You may see lever arms referred to as iso arms or jammer arms, but they all serve the same purpose.
Lever arms are arms that attach to your rack and move on a fixed lever system. You can load weight onto them and use the handles to perform a ton of different exercises.
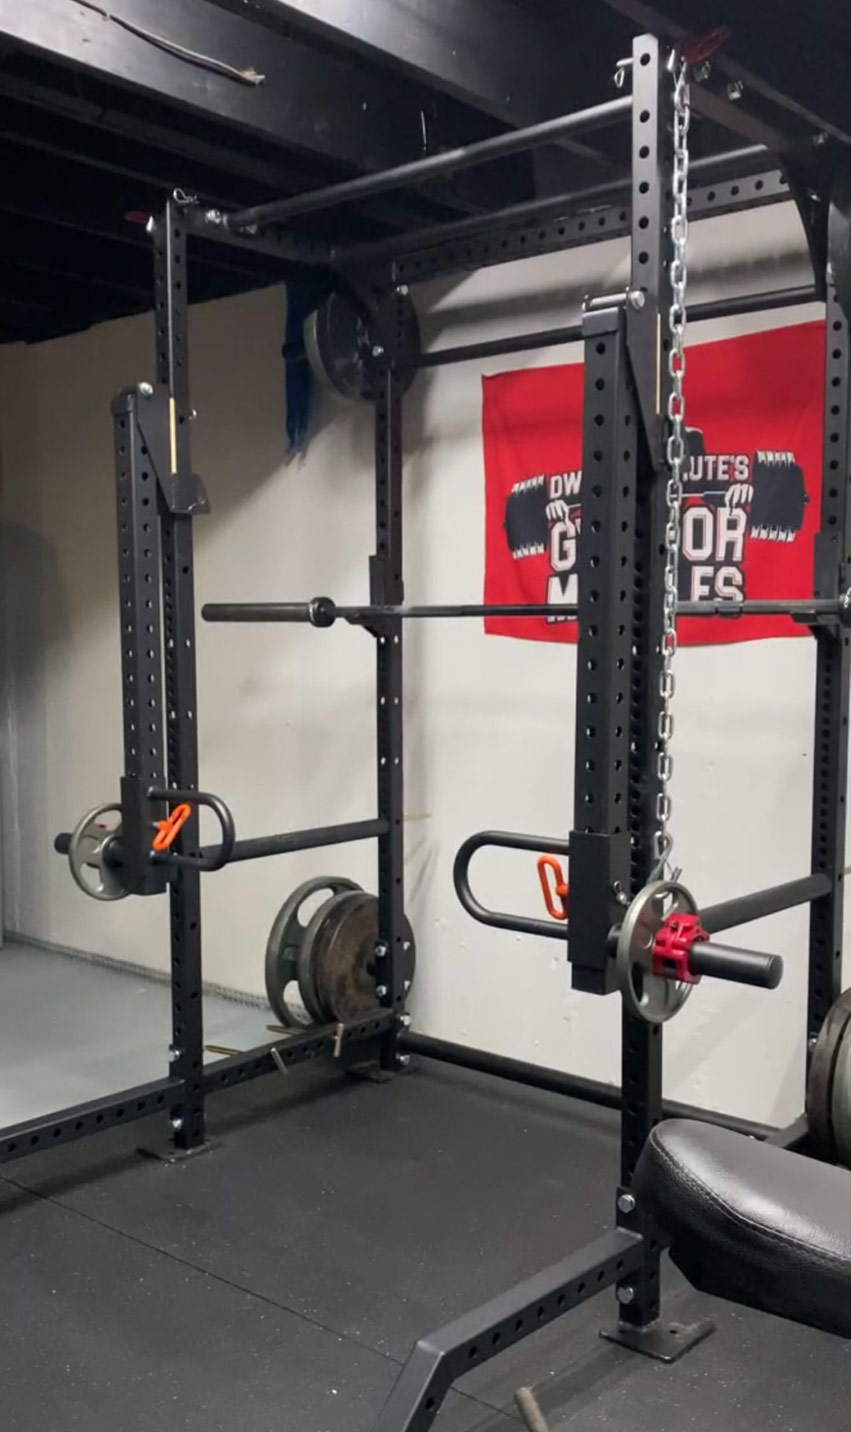
The photo above is my home setup, and I use Bells of Steel Lever Arms. These arms are built for a Bells of Steel rack, which is made up of 2.3″ steel tubing. Since my rack is 2×2″, I needed to do some slight modifications to make them fit properly (you can see what I’m referring to in the video breakdown) but it works great.
Depending on the type of rack you have, I also highly recommend Titan Fitness Lever Arms.
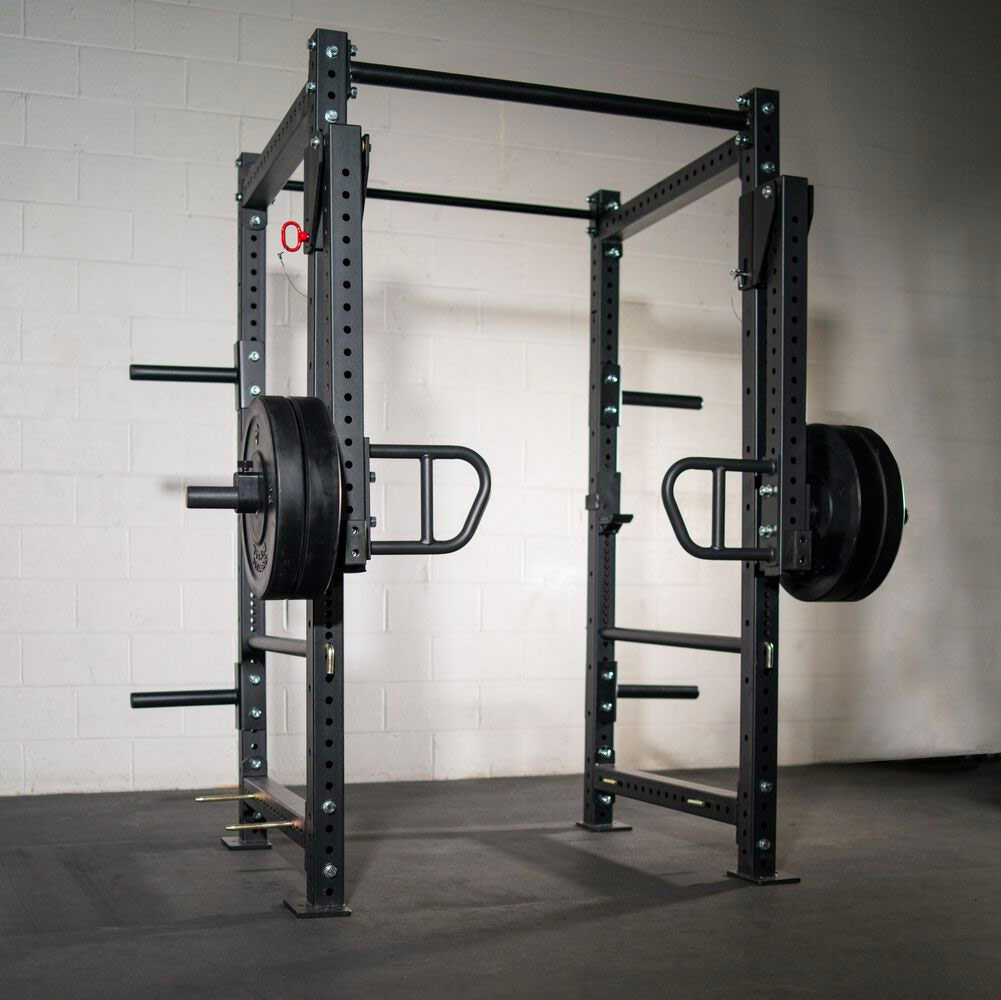
Titan has a few different variations depending on the rack you have, and you can check those out here.
Generally speaking, I recommend getting your rack & lever arms from the same company so you can ensure compatibility without needing to jump through any hoops. I have a Titan rack, but it has been discontinued and they no longer sell attachments for it, so I needed to go with the Bells of Steel Lever Arms.
If you want to spend way more (at the time of writing this, the Bells of Steel arms I use are $200 USD) you could always go with the Rogue Jammer Arms or Rep Fitness ISO Arms. Rogue is definitely the highest quality of all the home-gym companies, but that comes with a hefty price tag.
The Rep Fitness ISO Arms are actually really cool because they can be moved up and down your rack without removing the weights, which will save you A LOT of time and trouble. Plus, the ISO Arms can lock in the top position, keeping them out of your way.
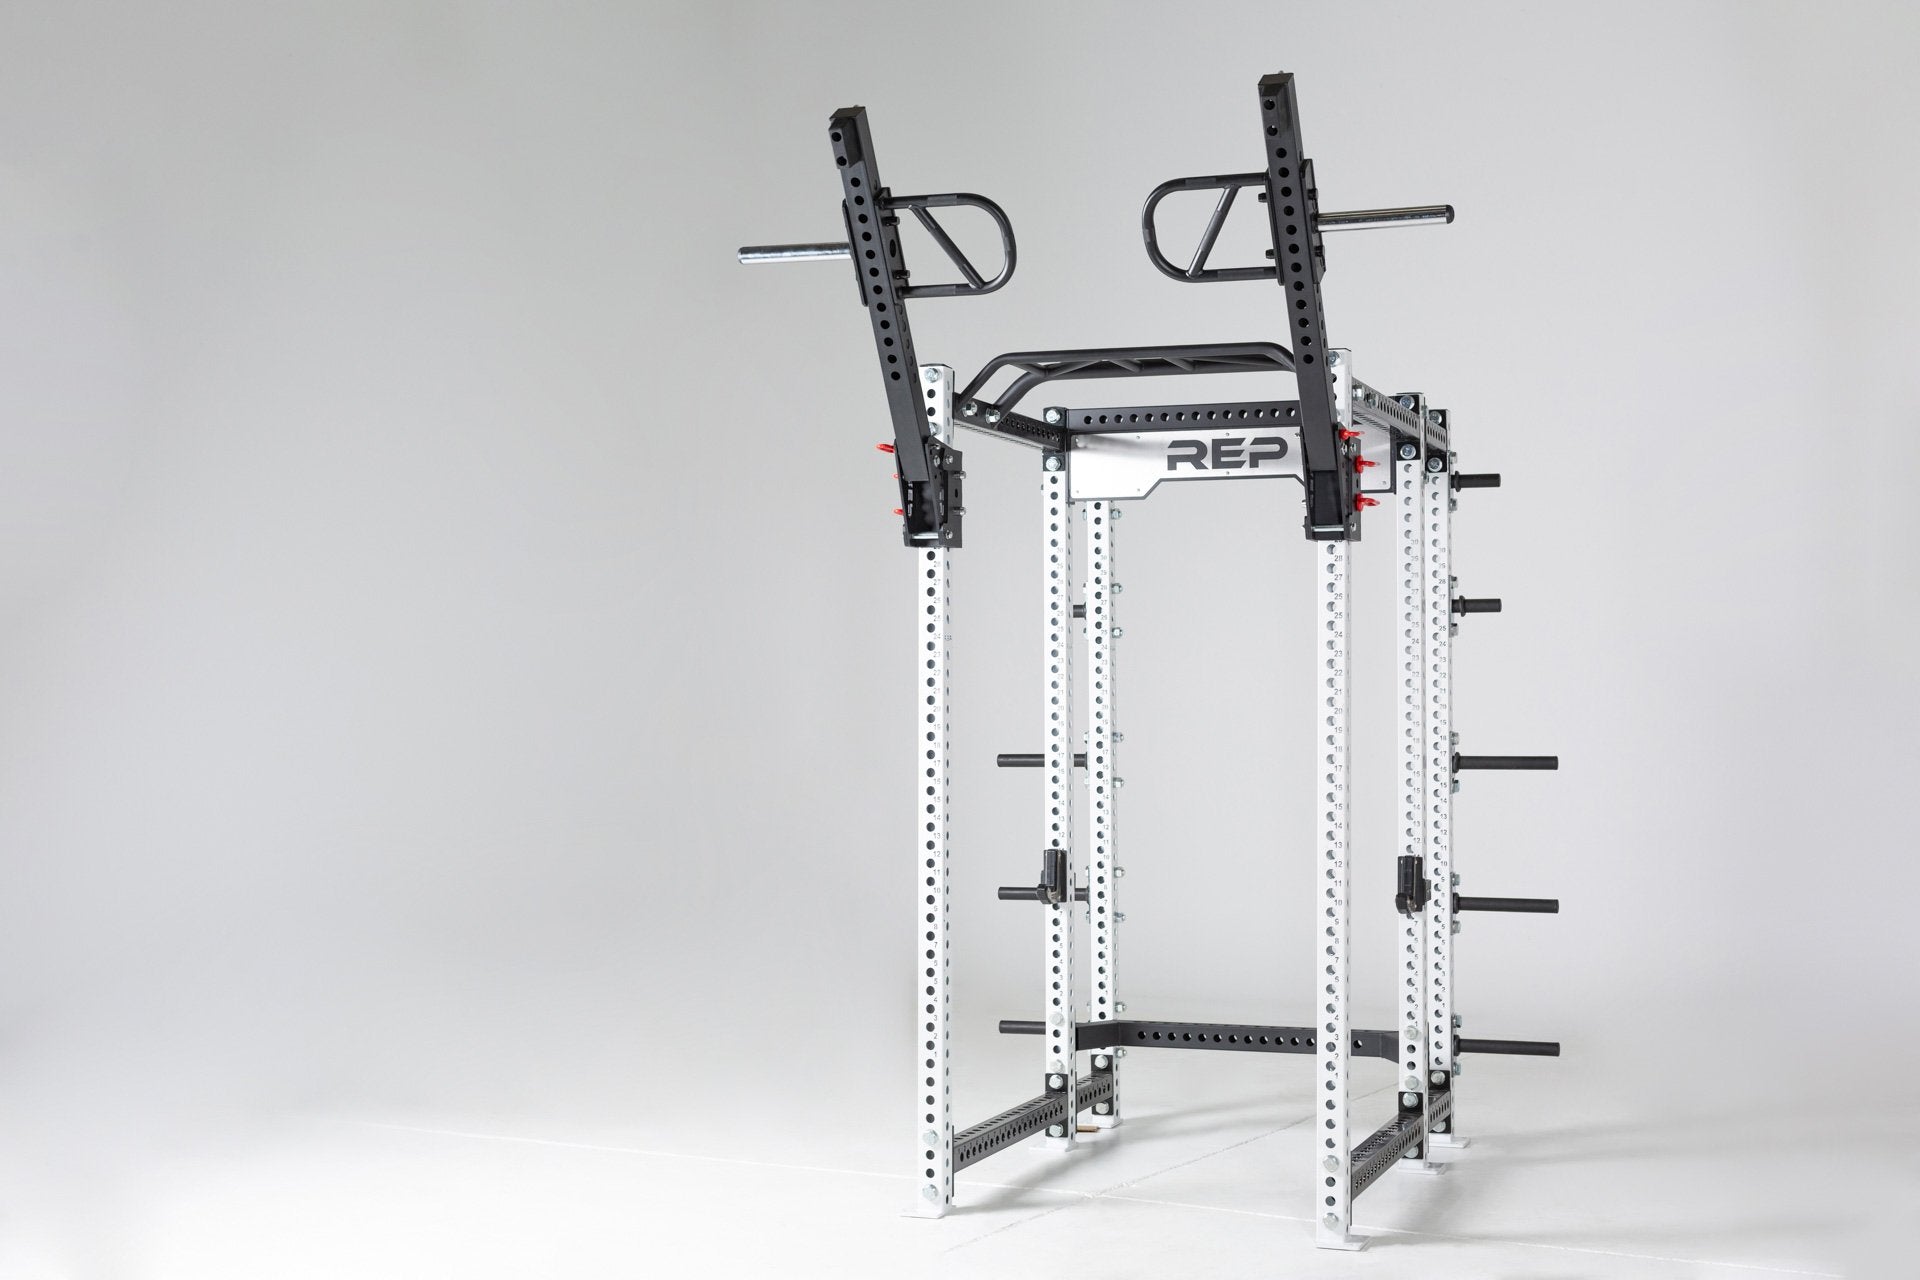
Whenever I get more space and upgrade my home gym equipment, I’ll likely go with the Rep Fitness ISO Arms to take things to the next level, but the Bells of Steel Lever Arms I have now are great for what I need and what I’ve used to demonstrate the exercises here.
How To Use Lever Arms Safely
Before we dive into the exercises, I want to be VERY clear about how to safely use your lever arms.
If your rack is safely bolted to the ground, you’ll have nothing to worry about. In those cases, your rack should be incredibly sturdy and able to handle the arms without an issue.
My rack was not bolted down, and when I first started playing around with the lever arms, I found that my rack was beginning to tip when the weight went high enough.
Needless to say, that is a huge safety risk.
Since I was not planning on bolting down my rack, I did the next best thing: attaching stabilizer feet.
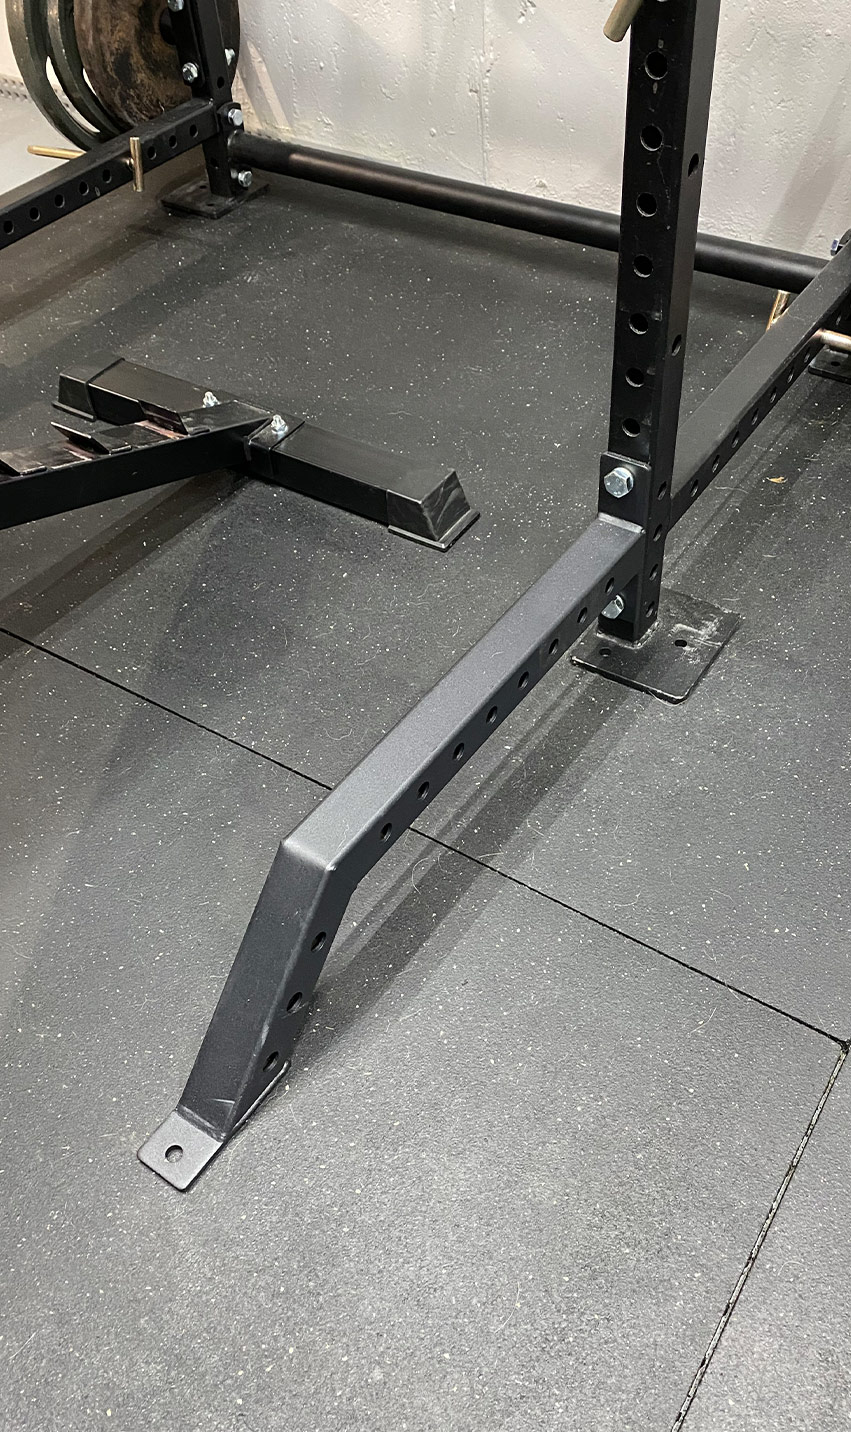
These feet act as extensions on your rack to create extra stability.
When you attach the lever arms to the front of the rack, these stabilizer feet will prevent the rack from tipping over. If your rack is not bolted down, you absolutely need to get yourself some stabilizer feet.
When I first built my home gym, I didn’t have my rack stabilized (and I also had all of the weight plates in the front)… needless to say, it was not the safest thing I’ve ever done.
Add-ons and Accessories for Lever Arms
As you go through this guide, you’ll see that I use chains to hold my lever arms in a specific starting position.
I learned this trick from the Morning Lifter blog, and you can check out that entire blog post right here, as he does an amazing job explaining how to set them up.
Attaching one pin to the rack and one pin to the lever arm, you can use the chains to position your arms in a wide variety of positions to open up a ton of possibilities.

If you want to buy the same chains & pins I have, I bought these 48″ chains and these hitch pins off Amazon.
For other exercises, you will also see me using a bar between my two lever arms. I purchased an adjustable pullup bar from Bells of Steel to fit perfectly between my lever arms.
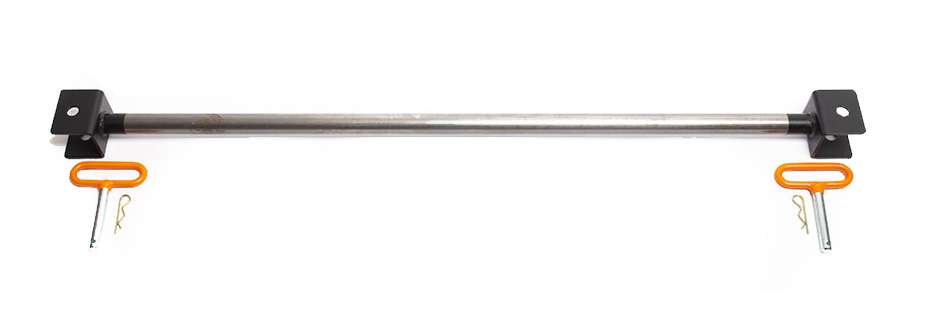
This bar is designed to specifically fit their lever arms, which measure 2.3″x2.3″, so it won’t fit your lever arms if you have a standard 3″x3″ size. Titan has its own version for 3″ racks that you can find right here.
UPDATE: Since creating this post, I’ve added the Leg Press Attachment from Titan Fitness. This is a solid footplate to use for various leg exercises that replaces the bar in some of the below demonstrations.
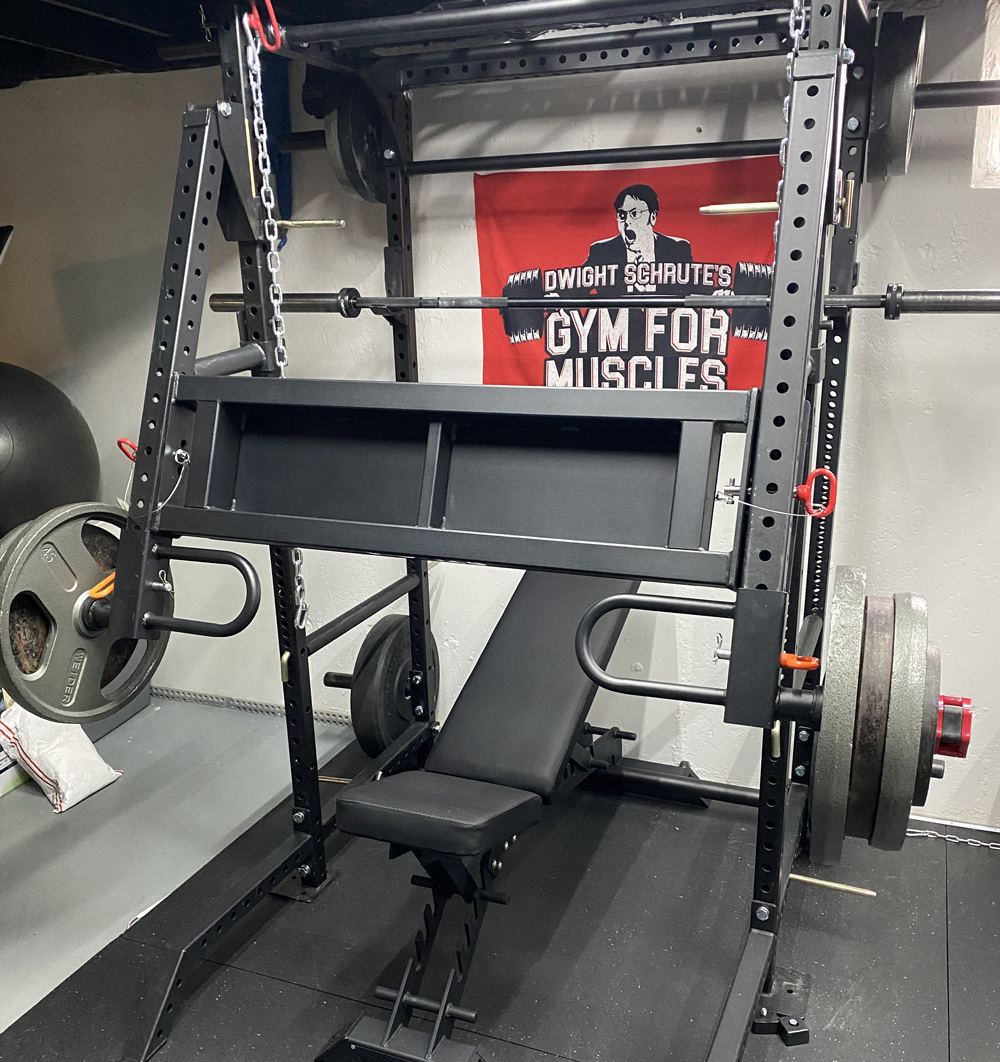
I now use this attachment for various leg press exercises, as well as calf raises.
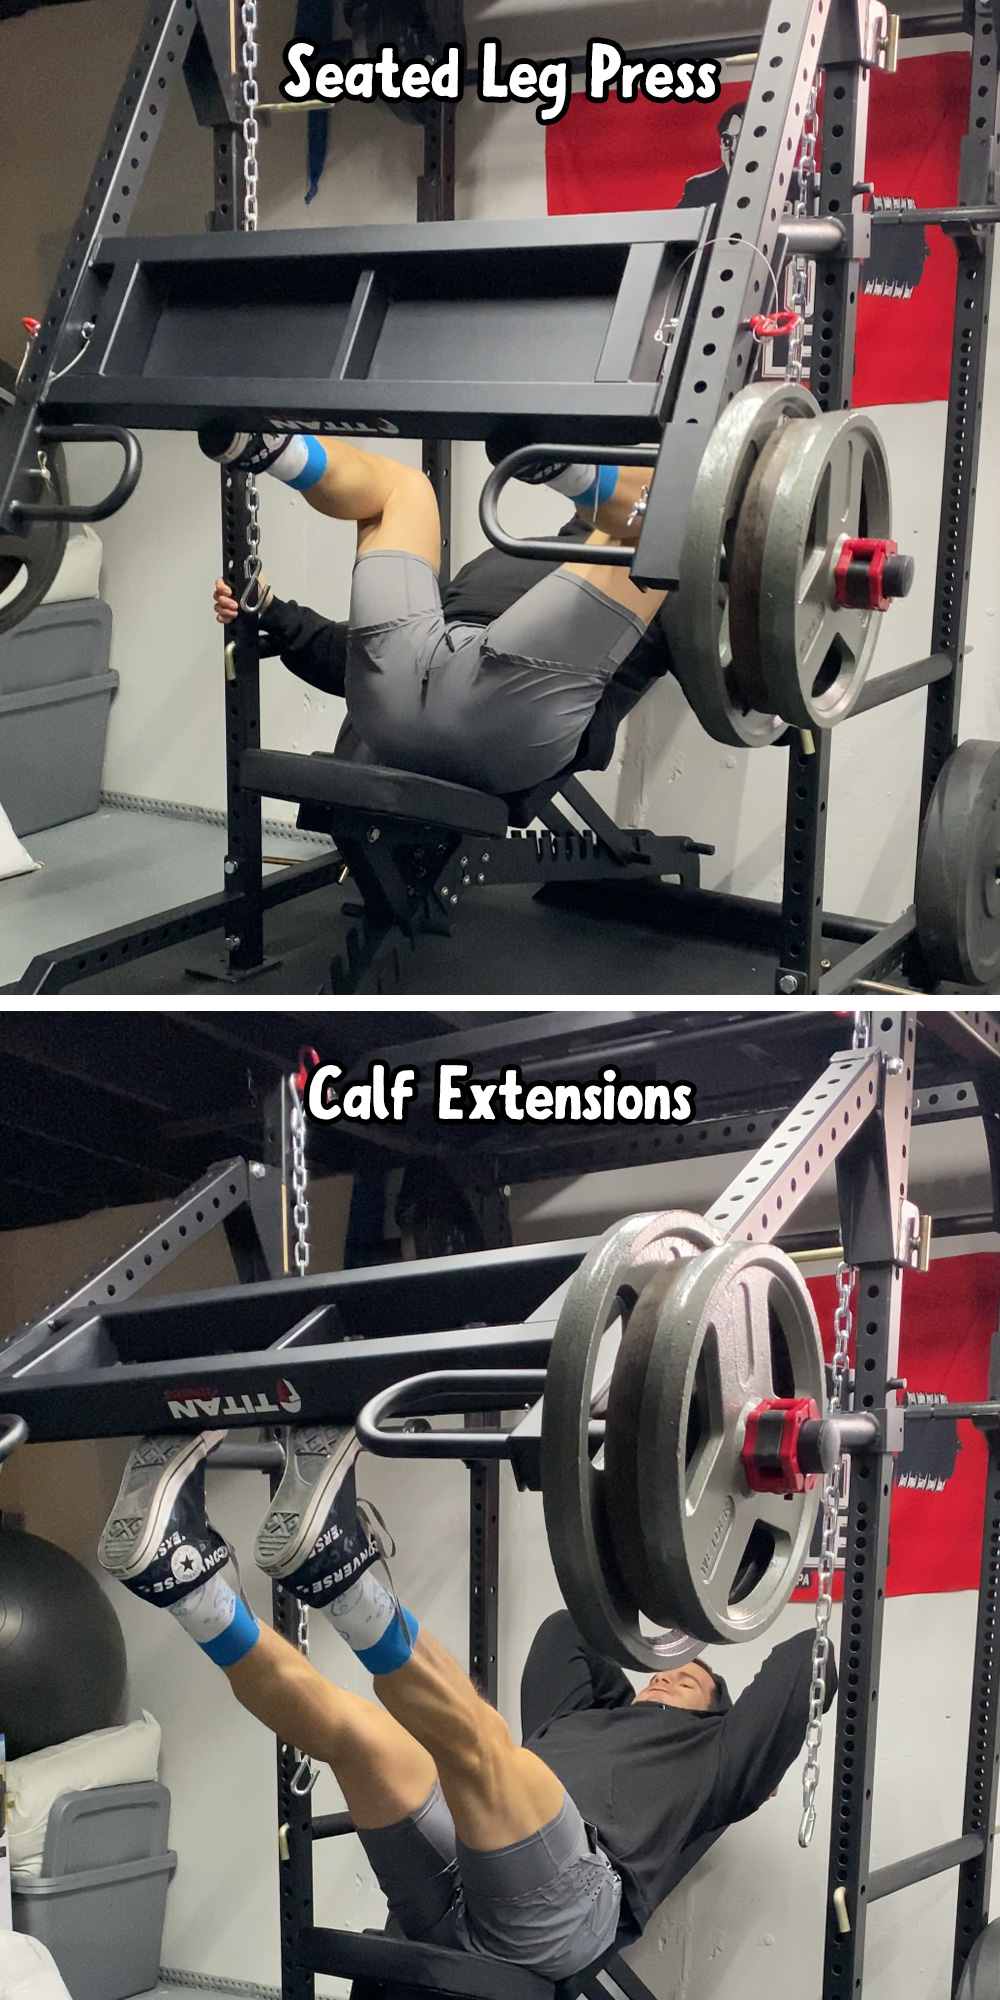
This leg press attachment is definitely not necessary as you can perform these same exercises with just a bar, but I enjoy the added stability for leg press exercises.
Chest Exercises To Do With Lever Arms
Seated Standard Chest Press
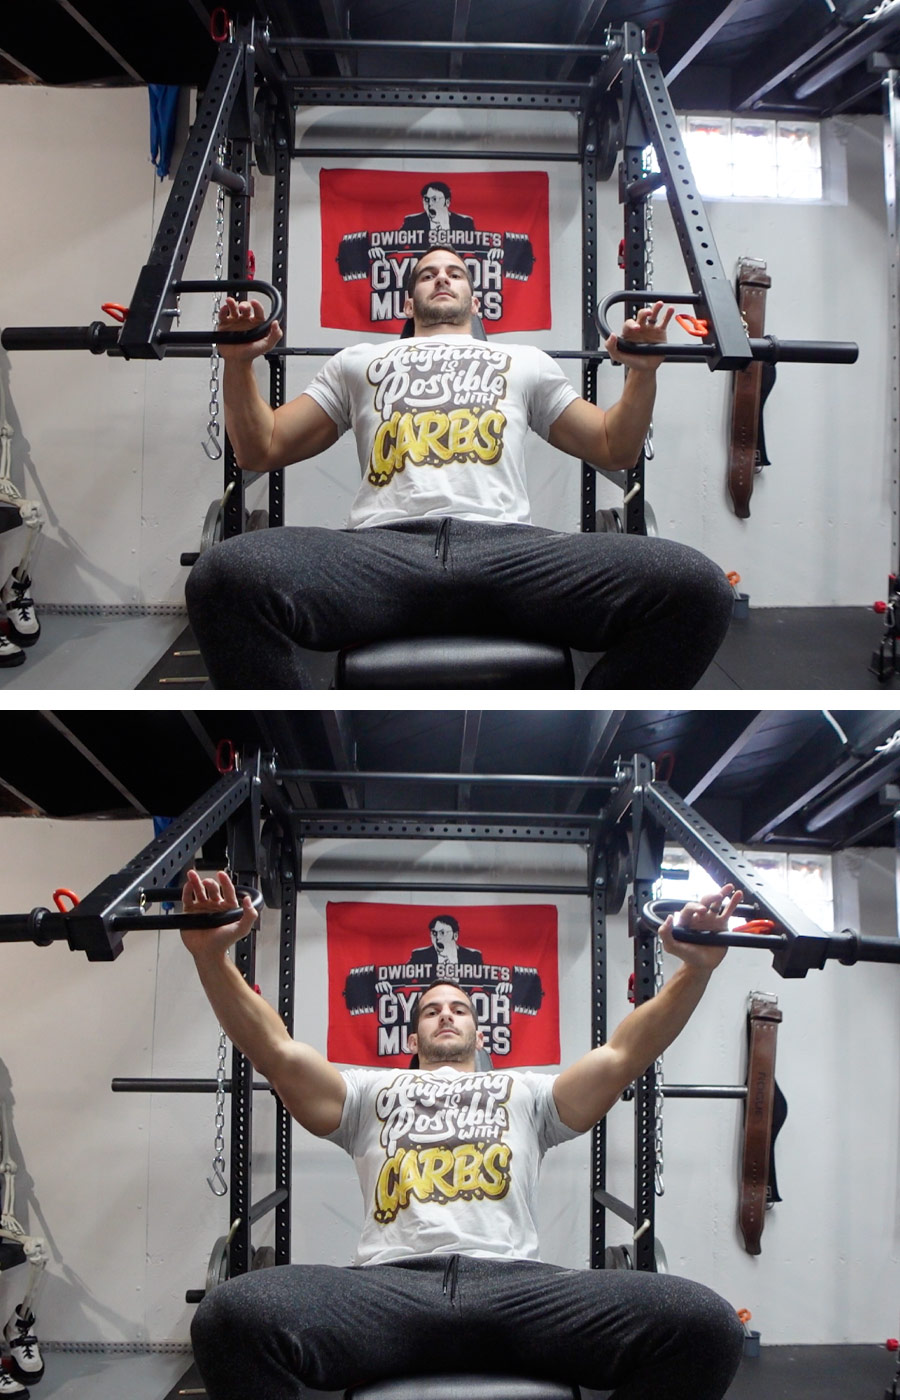
This seated chest press will rival any seated chest press machine in the gym.
To get set up, put a weight peg under the arms to create a starting position that is away from the rack. Then, position your bench at a slight incline so the handles line up with your chest and you are able to push directly away from your chest.
I know it may seem odd that the bench is on an incline for a flat bench, but the lever arms move in an upward motion, so you need the slight incline to create a straight range of motion.
Seated Incline Chest Press
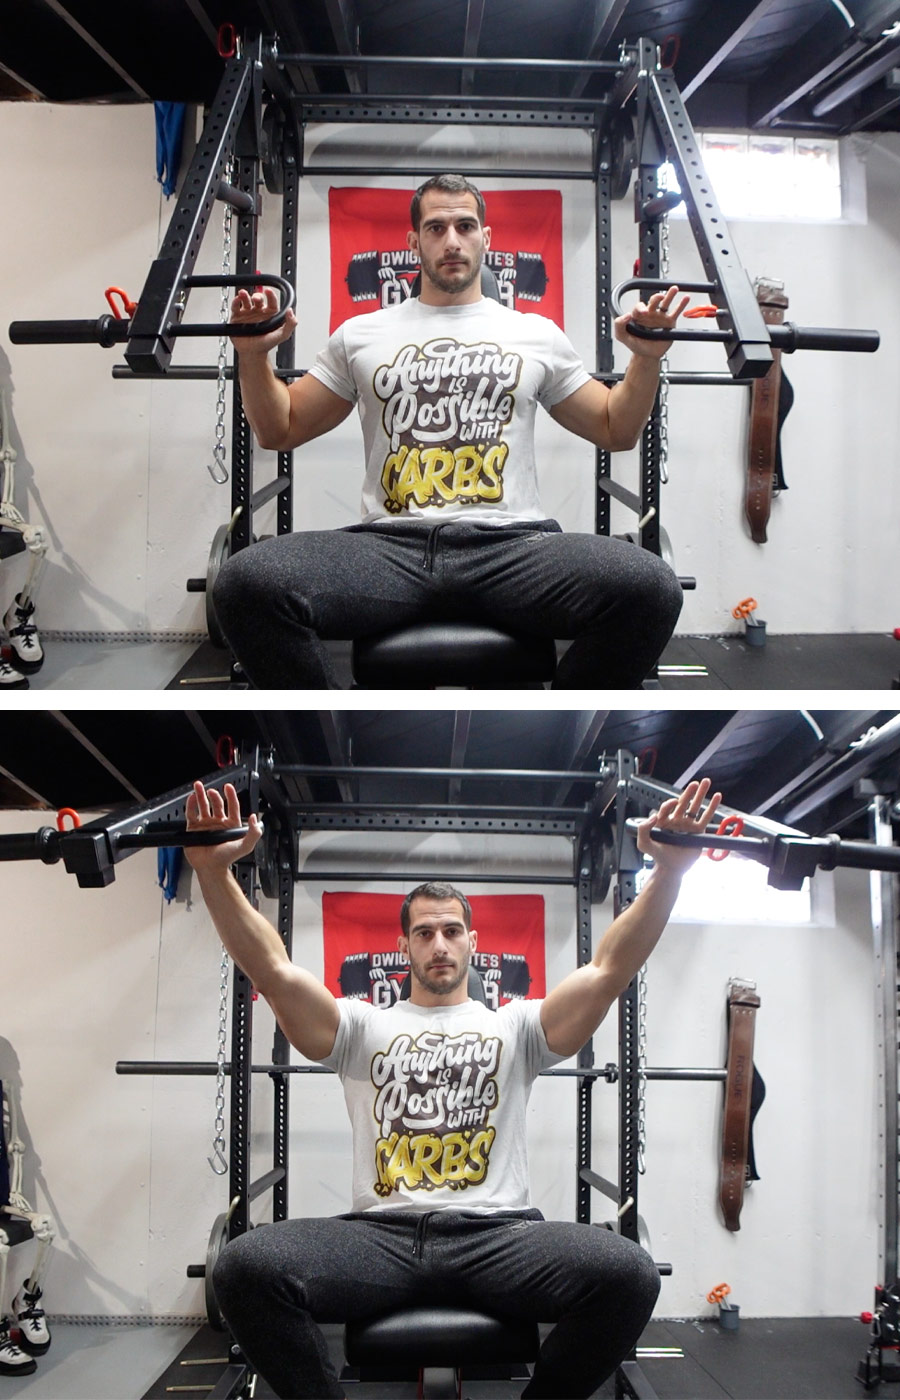
The seated chest press is definitely my favorite exercise to perform with my lever arms (despite my face looking absolutely miserable in the demonstration).
Place weight pegs under the lever arms to get them into a starting position that is away from the rack. Then use a 90-degree bench (or as close to 90 degrees as you are able to get) to get into a position where the handles align with your upper chest.
The lever arms should push out and up, ending in a position that is higher than your shoulders and really targeting your upper chest well.
Seated Decline Chest Press
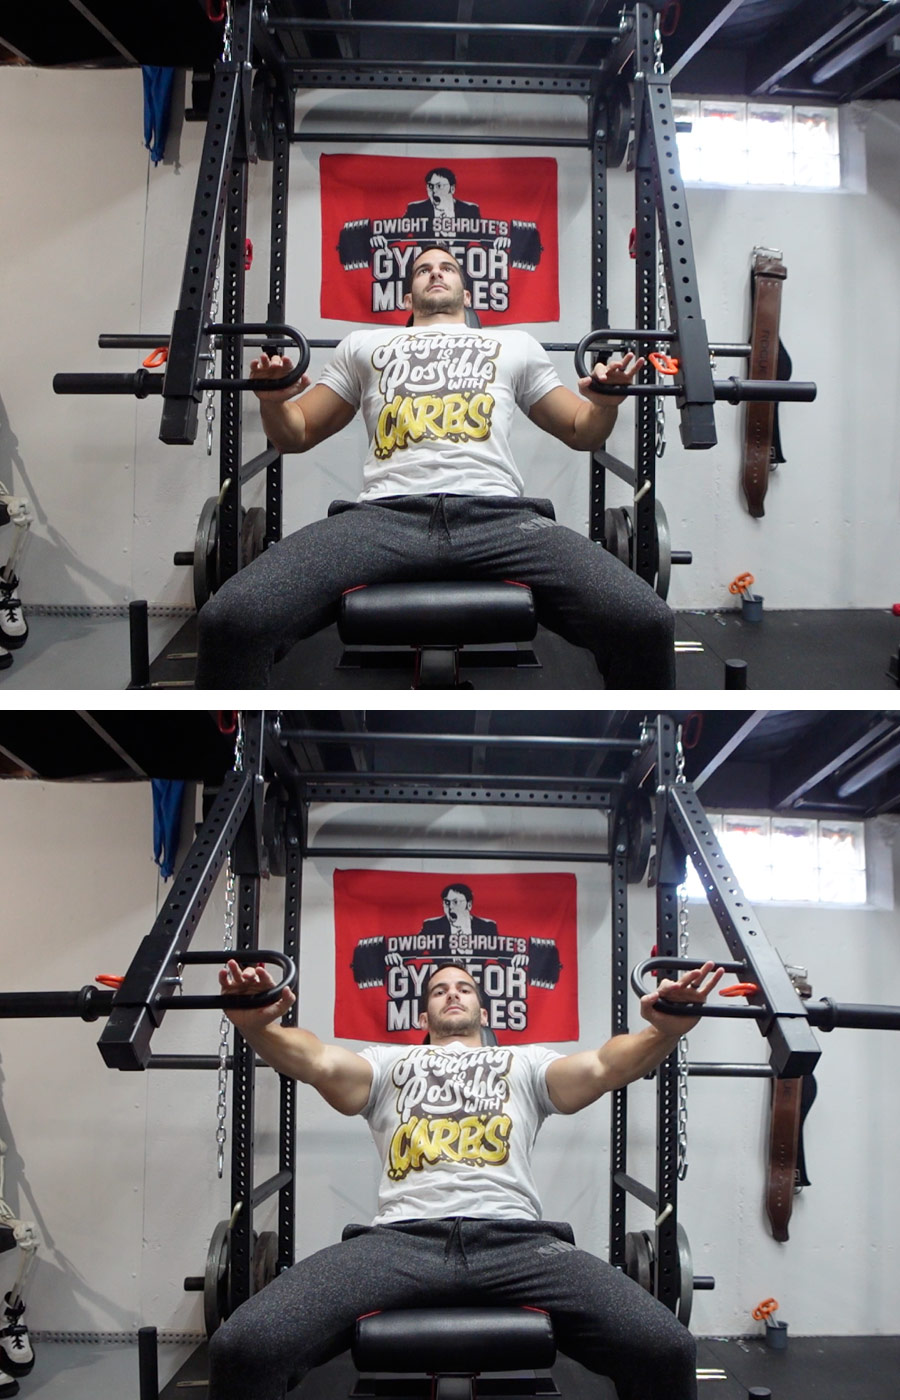
Unlike the other seated chest press variations, we don’t need the weight pegs under the arms for this setup.
Instead, the arms can sit flat against the rack for the decline press.
Position your bench with a slight incline as you are able to align the handles with your lower chest and push directly out away from your body.
Flat Bench Press
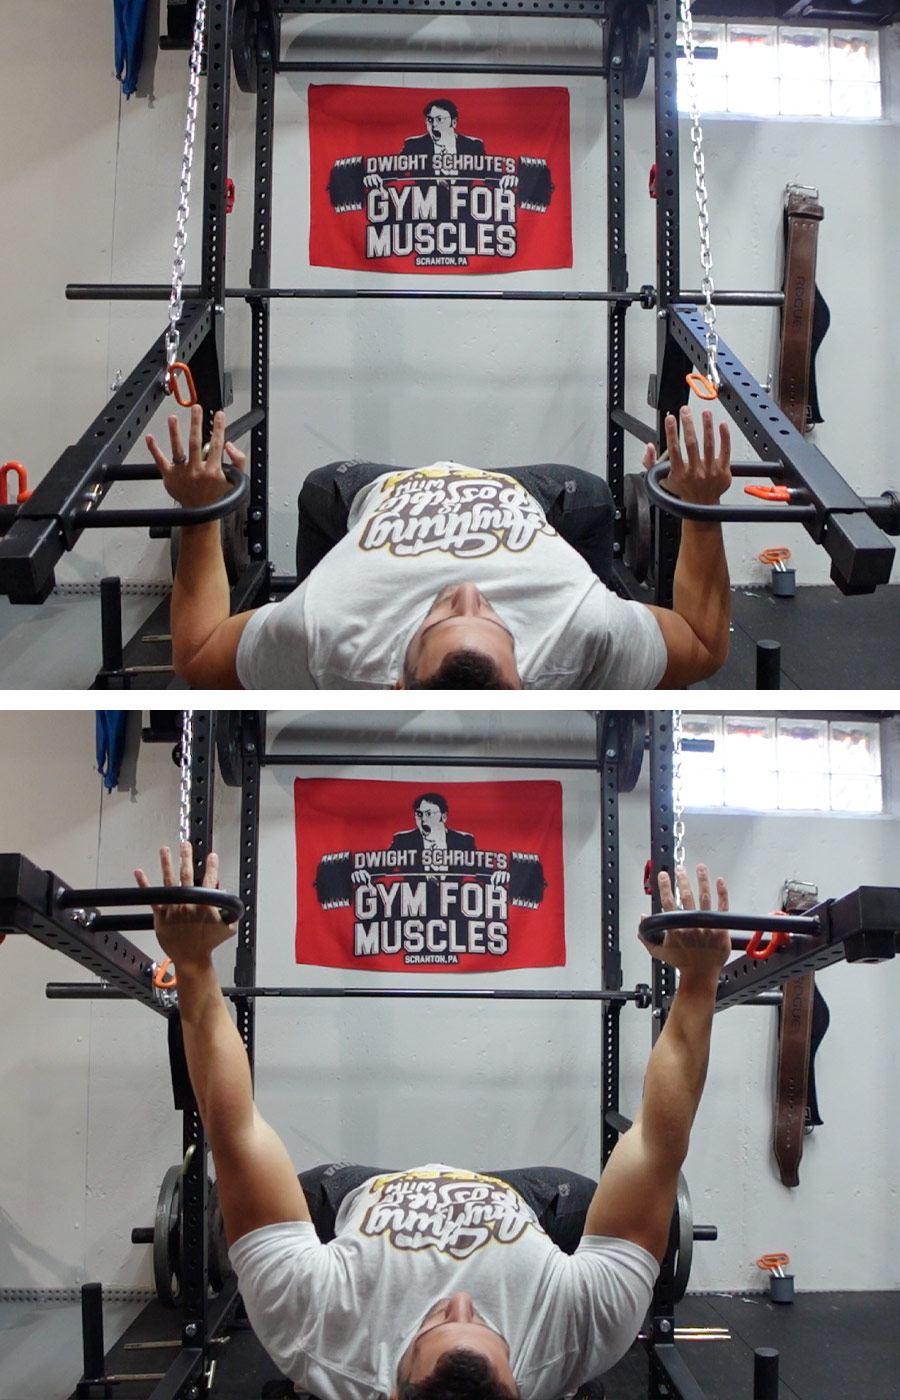
For any of our bench press variations, we’re using 48″ chains and hitch pins to hold the lever arms in a comfortable starting position.
Position the lever arms so they are on a slight decline- if they are perfectly horizontal when you push up, they are going to be moving towards the rack. By having the lever arms start on a slight decline, you’re creating a perfectly straight range of motion.
Lay a flat bench in the center, and then facing either direction, use the handles to push directly up like a normal bench press.
Incline Bench Press
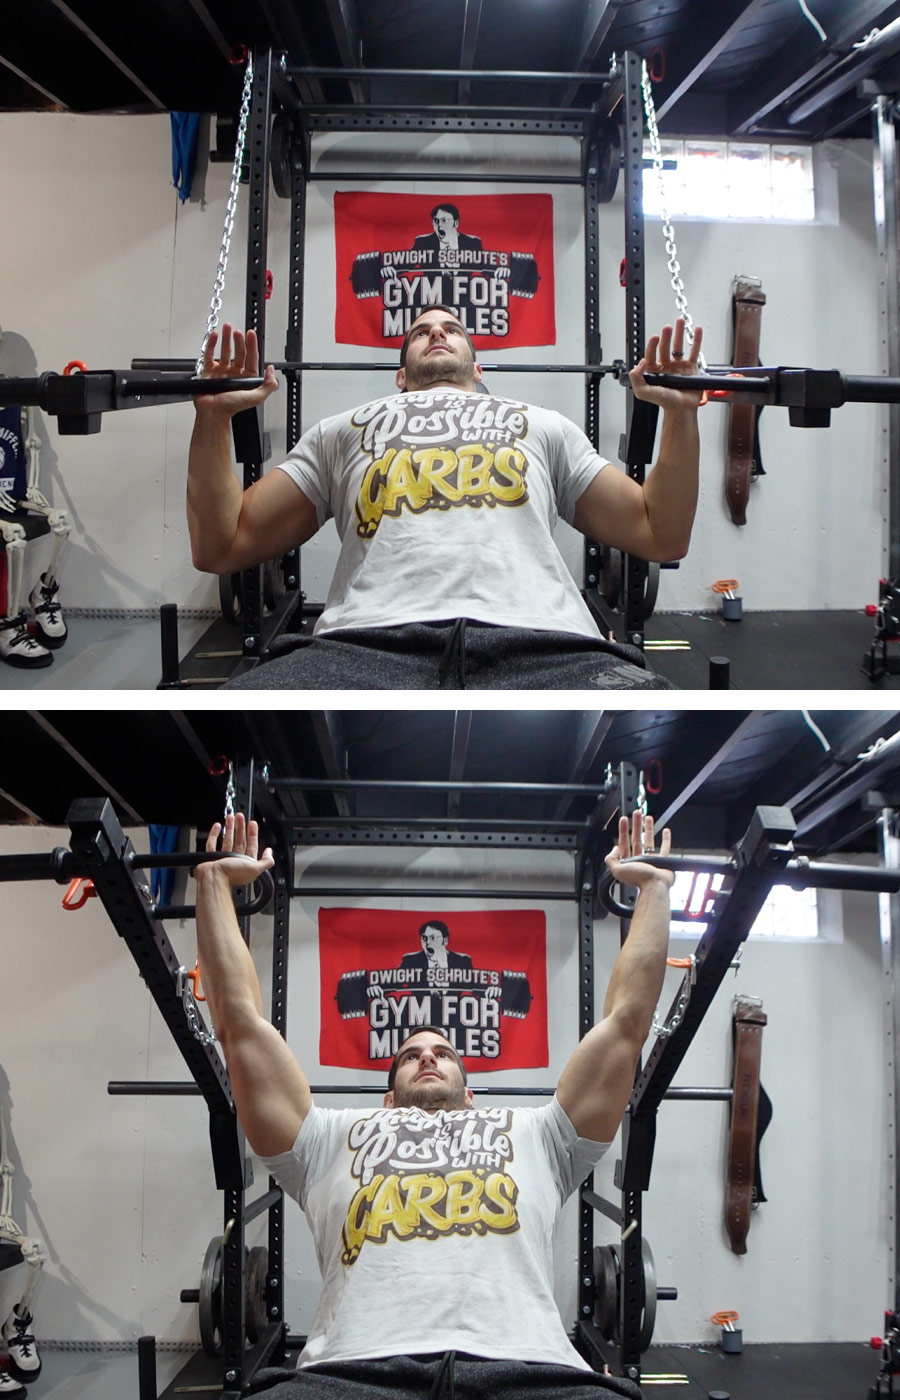
For the incline bench press, the lever arms can start at a horizontal position unlike the flat bench press above.
Get into a comfortable starting position with the handles aligned with your upper chest, then press directly up.
Decline Bench Press
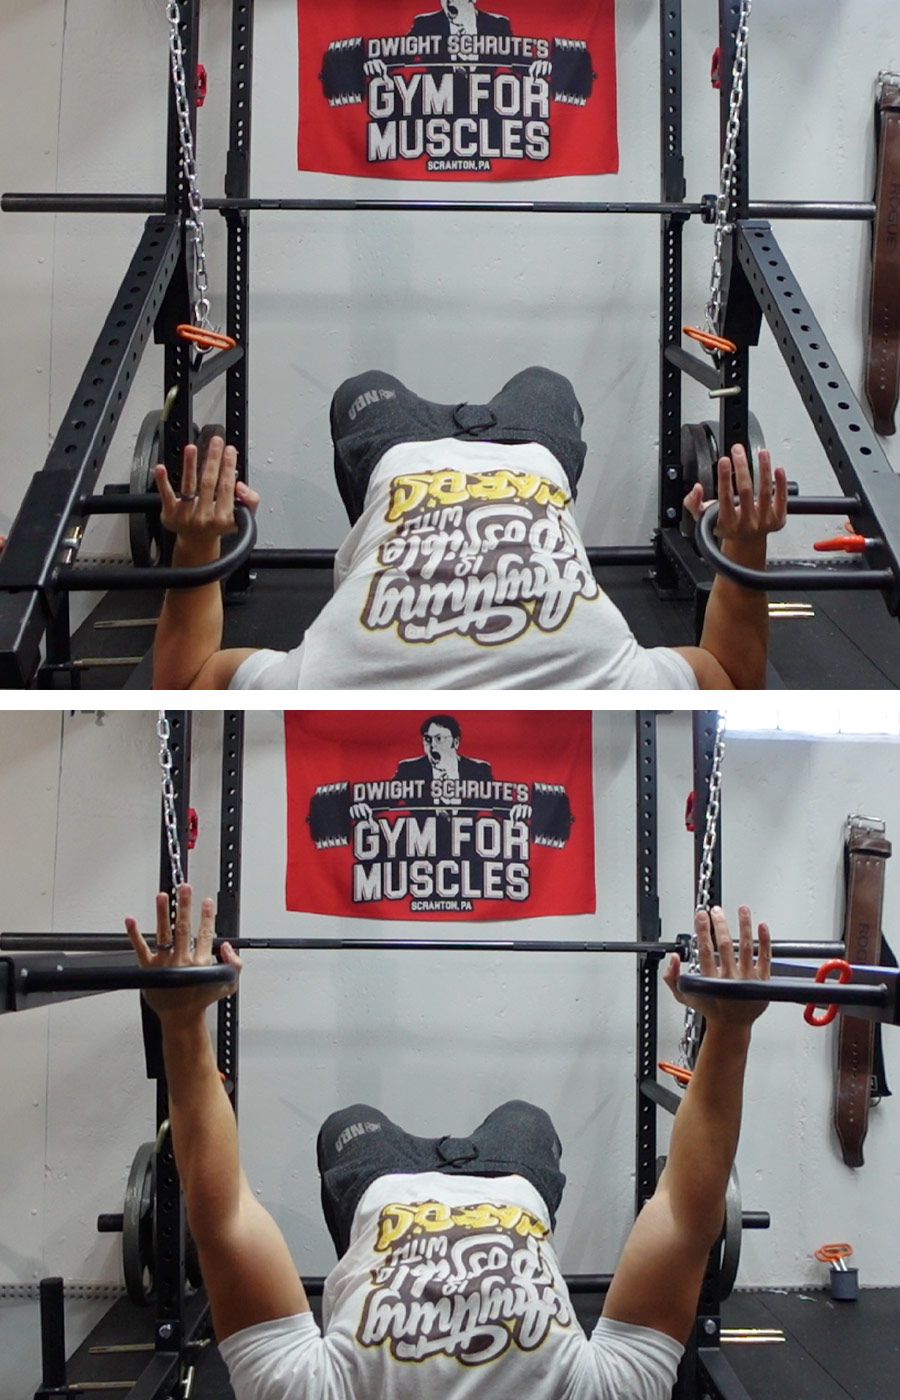
If you have a bench that allows a decline, you can easily set up a decline bench press. The starting position will be very similar to a standard bench press, with the obvious difference of the starting position for the lever arms being lower.
Cross-Body Side Chest Press
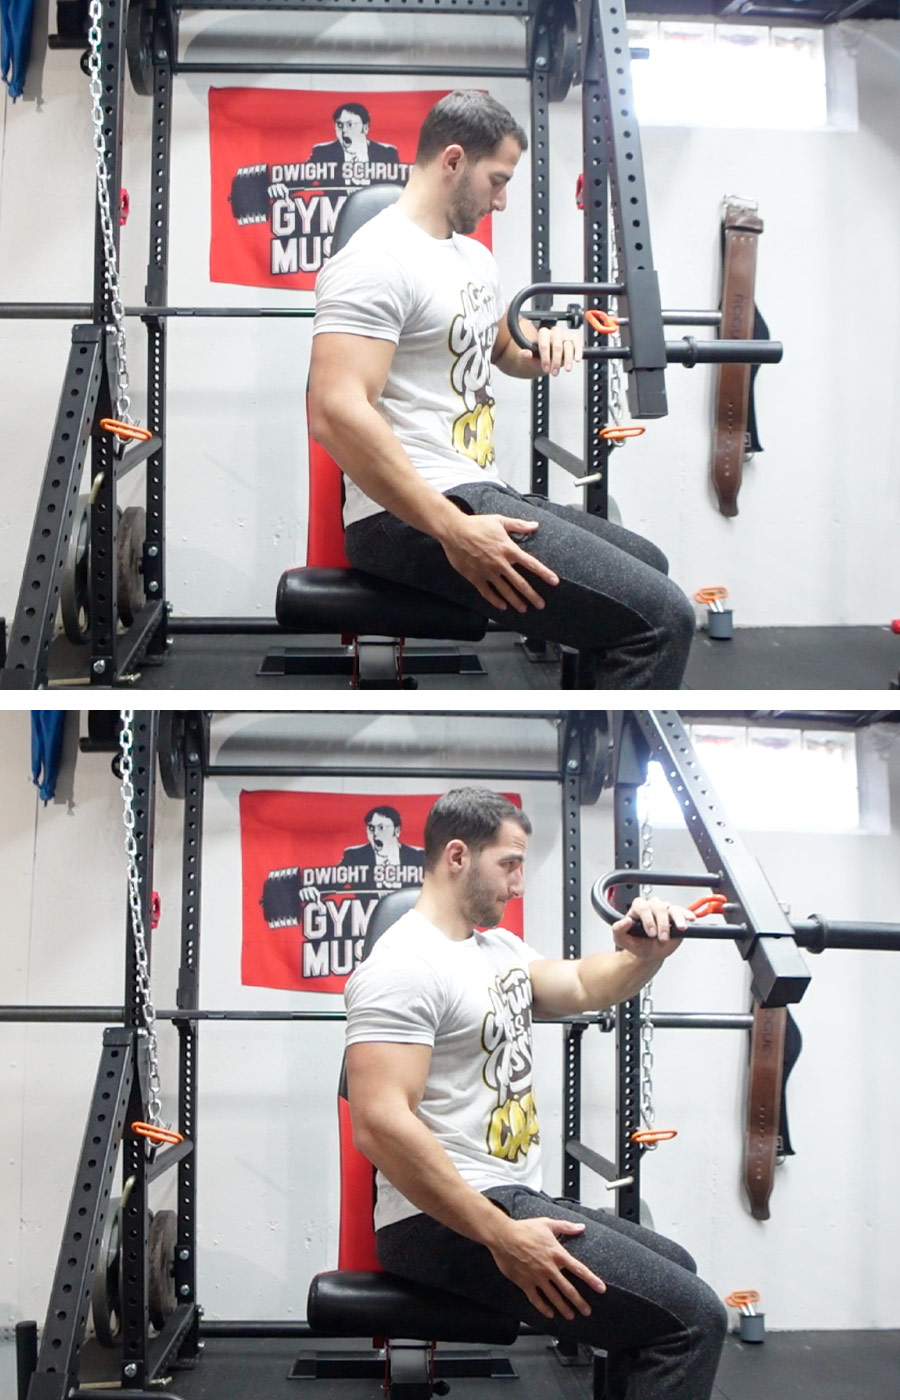
The cross-body press is very underutilized. If you’ve never tried them, prepare to fall in love.
Start with the lever arms flush against the rack with the handle in line with your chest.
Sit sideways on a bench, then push out across your body. You can keep the weight light on these and just focus on the muscle contraction, and it should feel similar to a chest fly exercise.
Floor Press
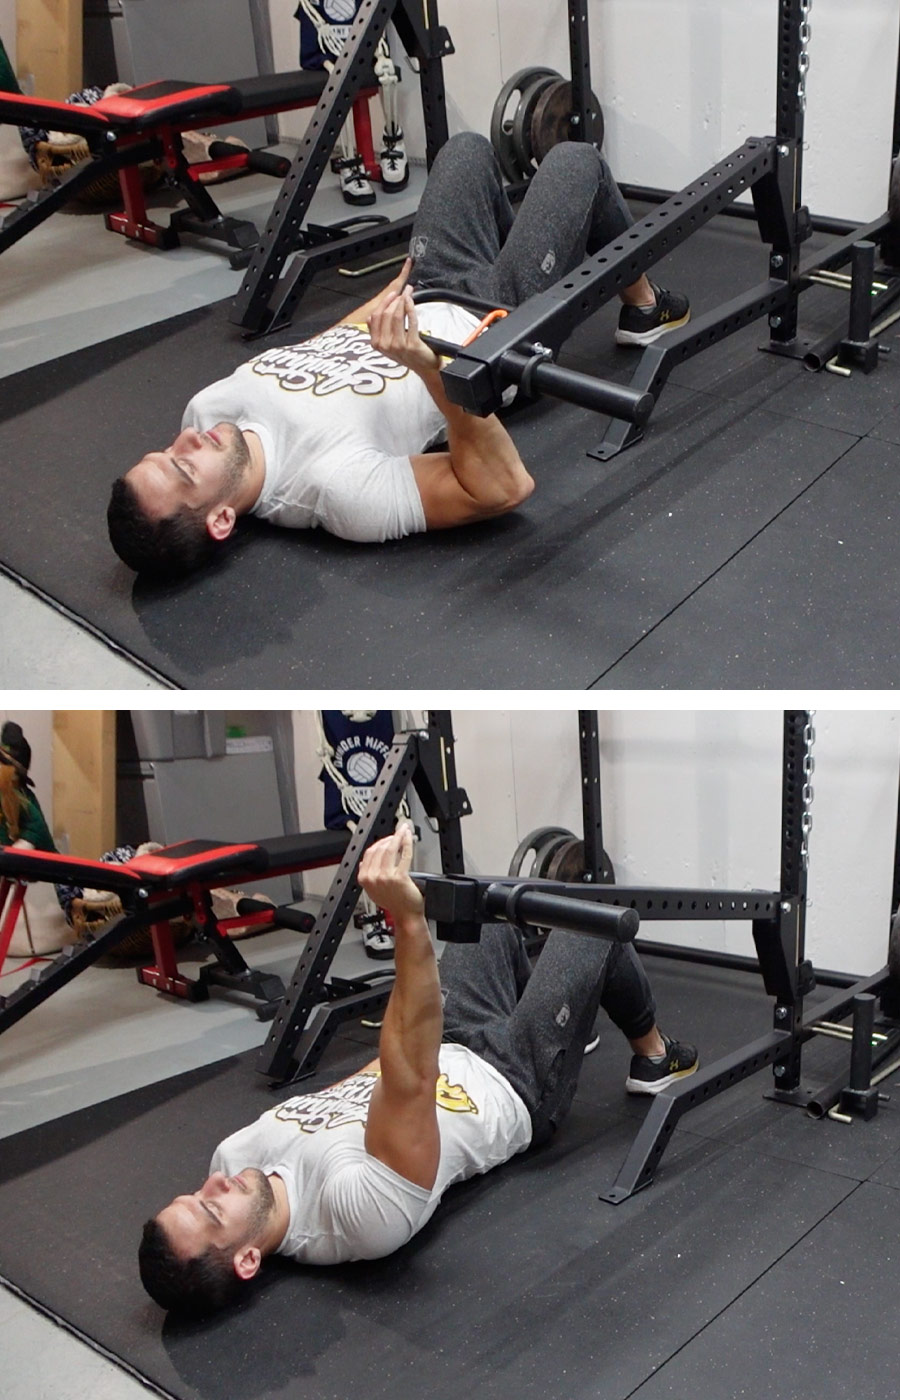
Floor presses are often used by powerlifters to help overcome “sticking points” at the top of the bench press.
By starting from a complete stop on the floor, you eliminate the bottom portion of the bench press, allowing you to press more weight at the top.
Being a single-arm exercise, you shouldn’t need to load up a ton of weight here in order to really feel it.
Back Exercises To Do With Lever Arms
Single Arm Bent Over Rows
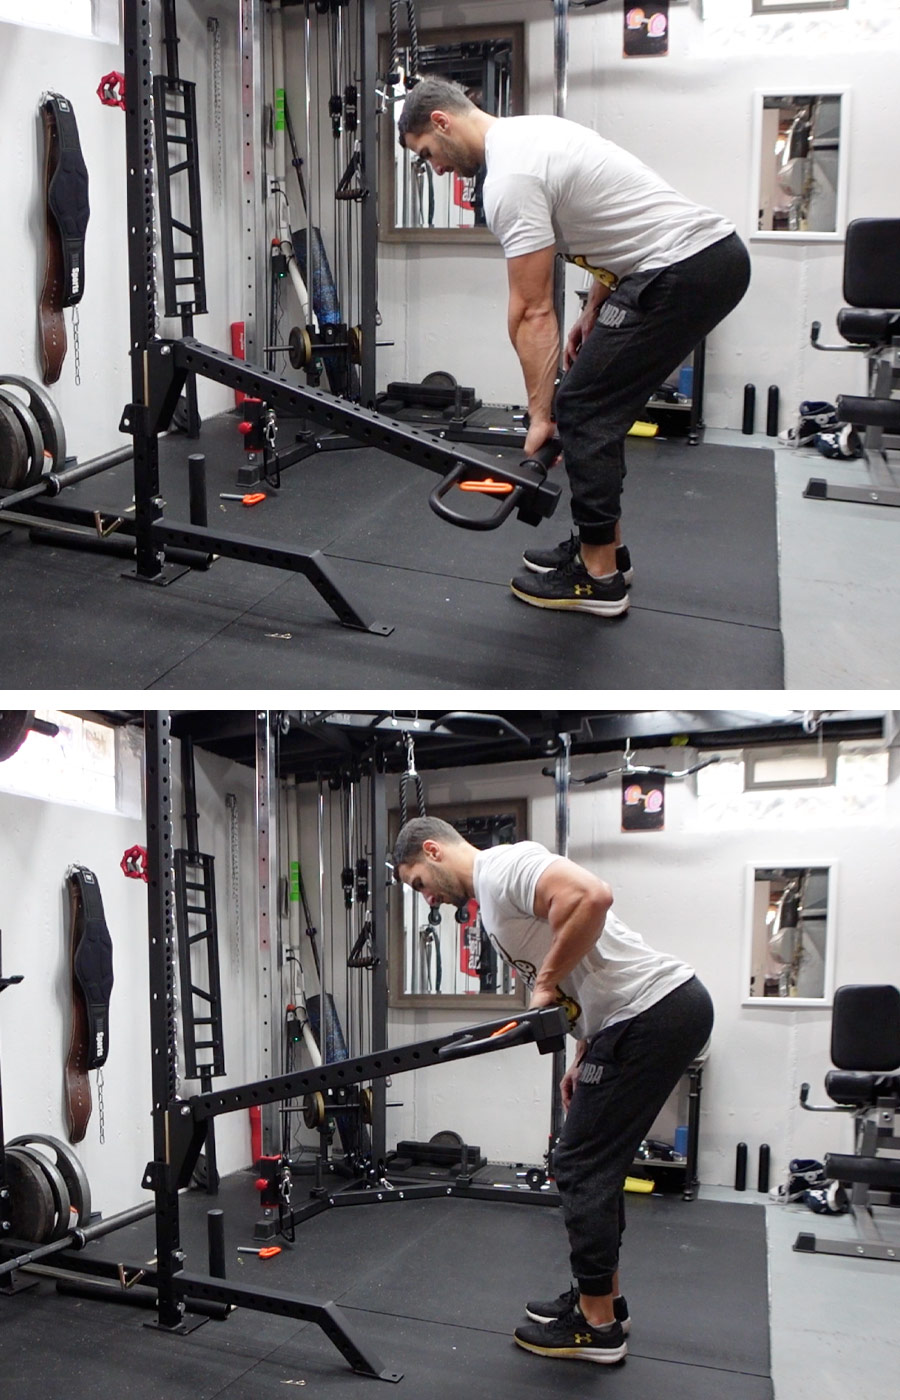
Bent-over rows are a classic back exercise and should be a staple of any regimen.
In the photo above, I’m holding the weight peg instead of the handle, but that is only so you can more easily visualize the correct form.
Keeping your back bent but straight, bend over and pull the weight up towards your body. Keep your elbows back so you can focus on squeezing your lats.
One of the main mistakes people make when rowing is that they pull way too high, typically towards their chest. When you do this, you’re putting too much stress on your shoulders & neck and taking the focus away from your back- keep those elbows back!
Bent-Over Barbell Rows
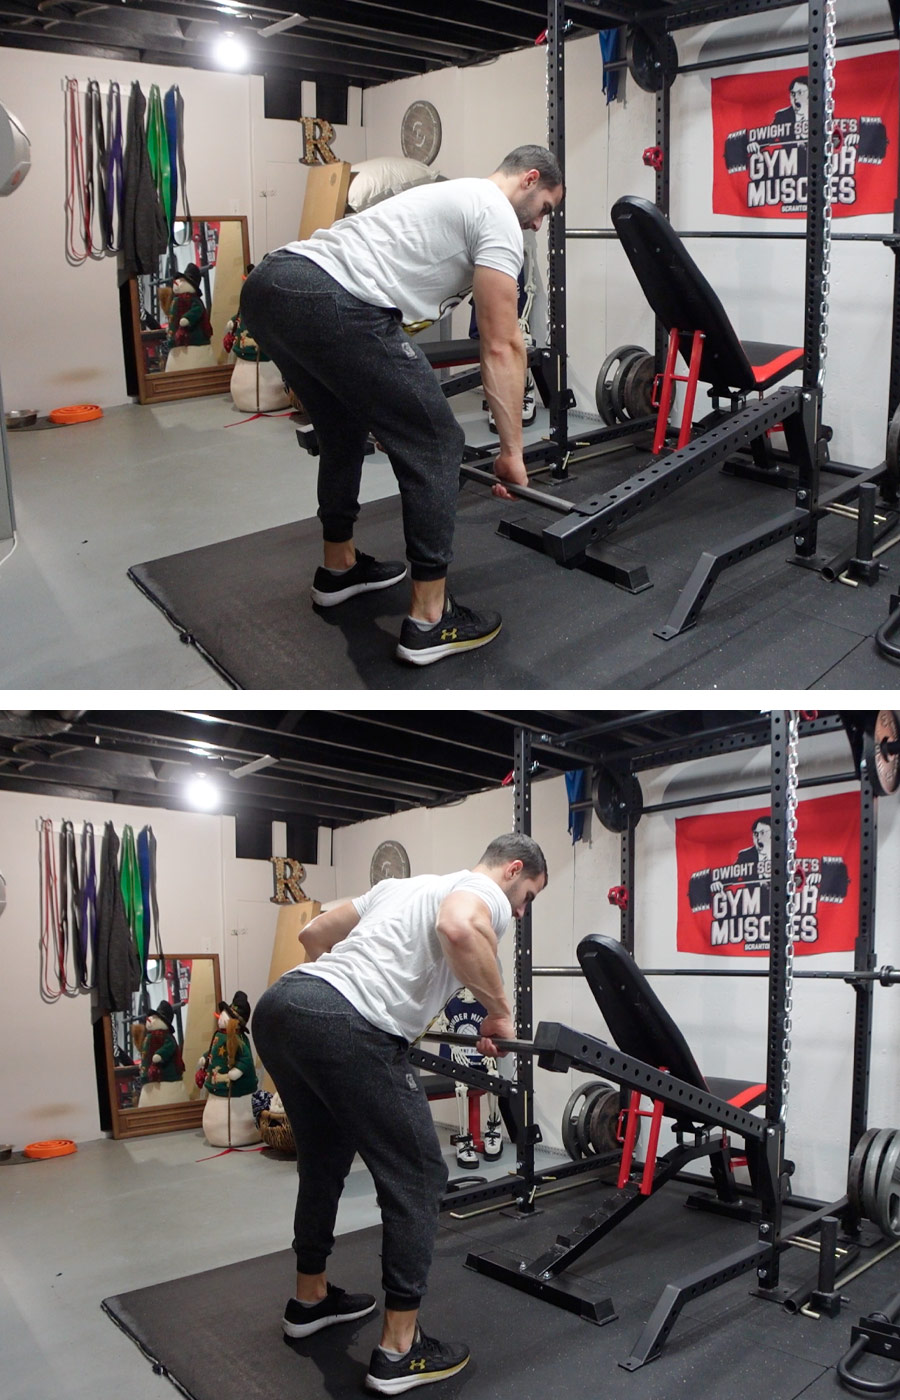
If you have a bar for your lever arms, you can perform bent-over barbell rows.
Just like the single-arm rows, be sure you keep your elbows back to pull towards your belly button rather than your chest.
Single Arm Bench Rows
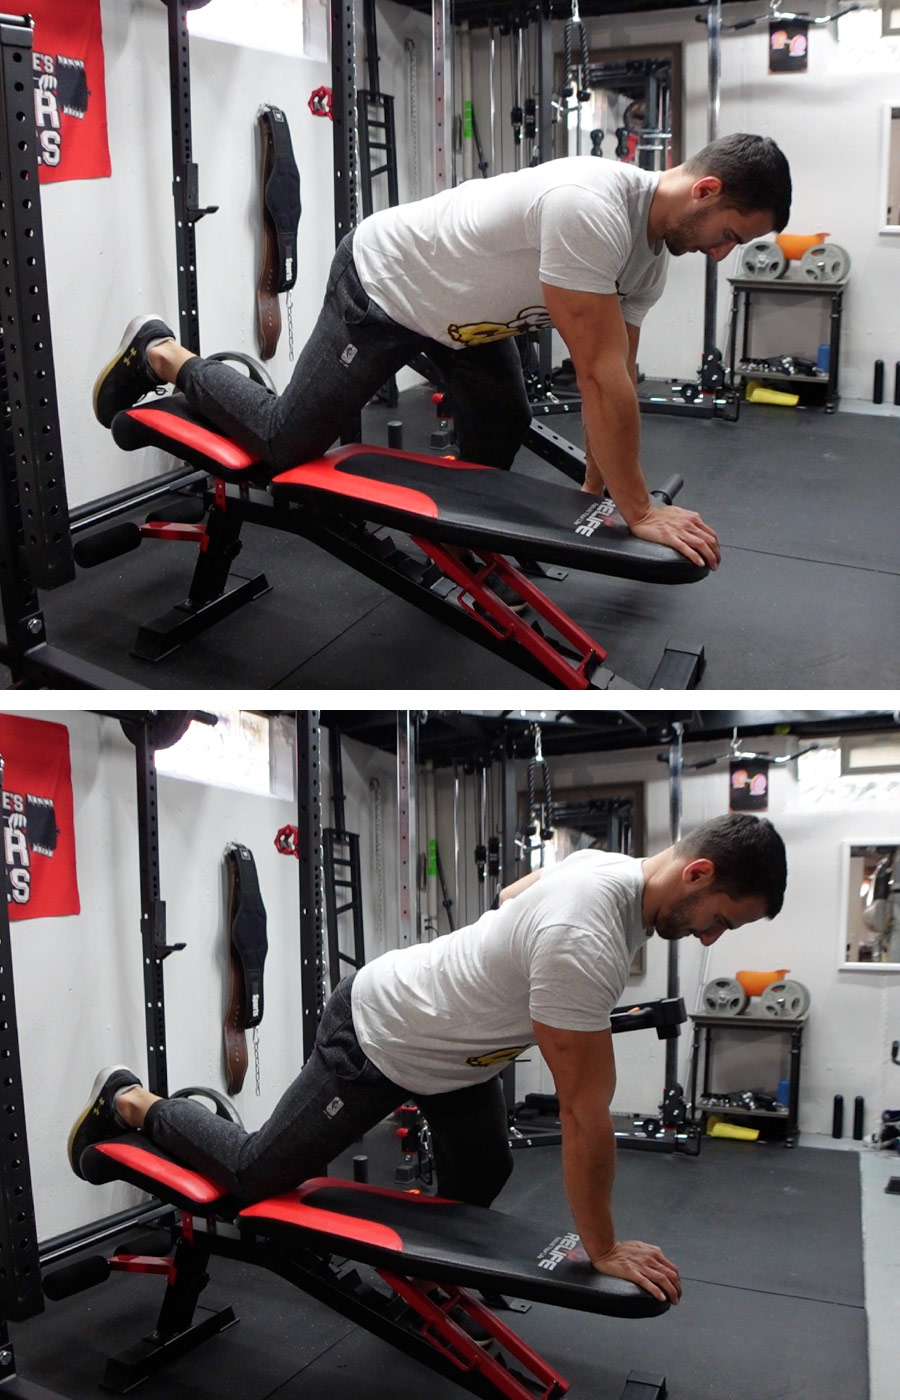
If you find bent-over rows uncomfortable, recruiting the help of a bench may be beneficial for you.
Put one hand and knee on a bench, then put your opposite foot out wide. Pull with your outside hand, keeping your back flat while pulling.
Seated Rows
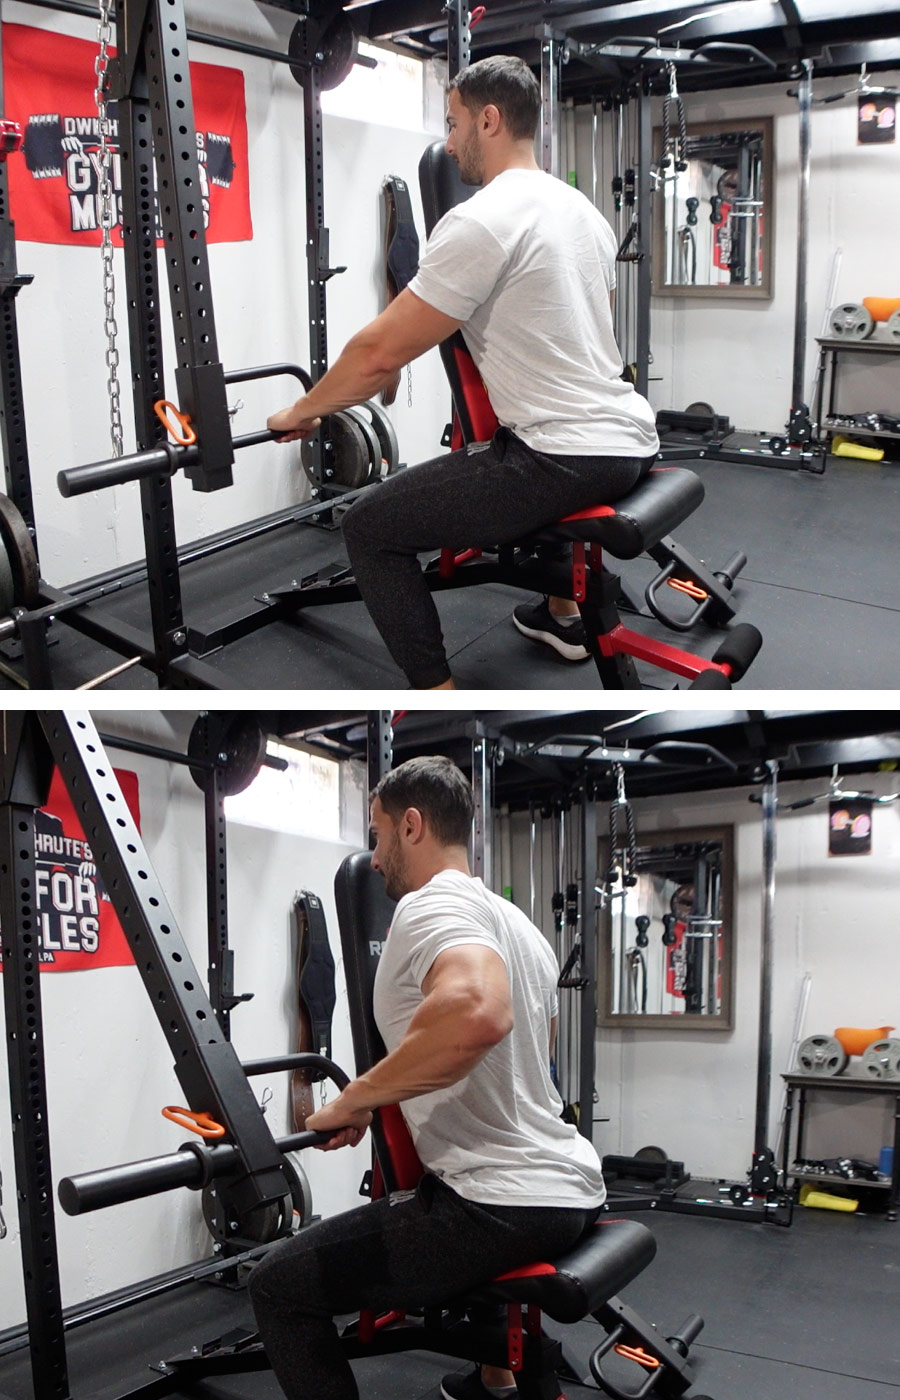
I always loved seated rows in the gym, so I was thrilled to be able to perform them with my lever arms.
Start with the lever arms flush against the rack, then position your bench about one foot back (or wherever is comfortable). With the handles starting around hip height, pull the weight towards your belly button.
The weight here is going to move slightly upward, creating a natural range of motion.
Seated High Rows
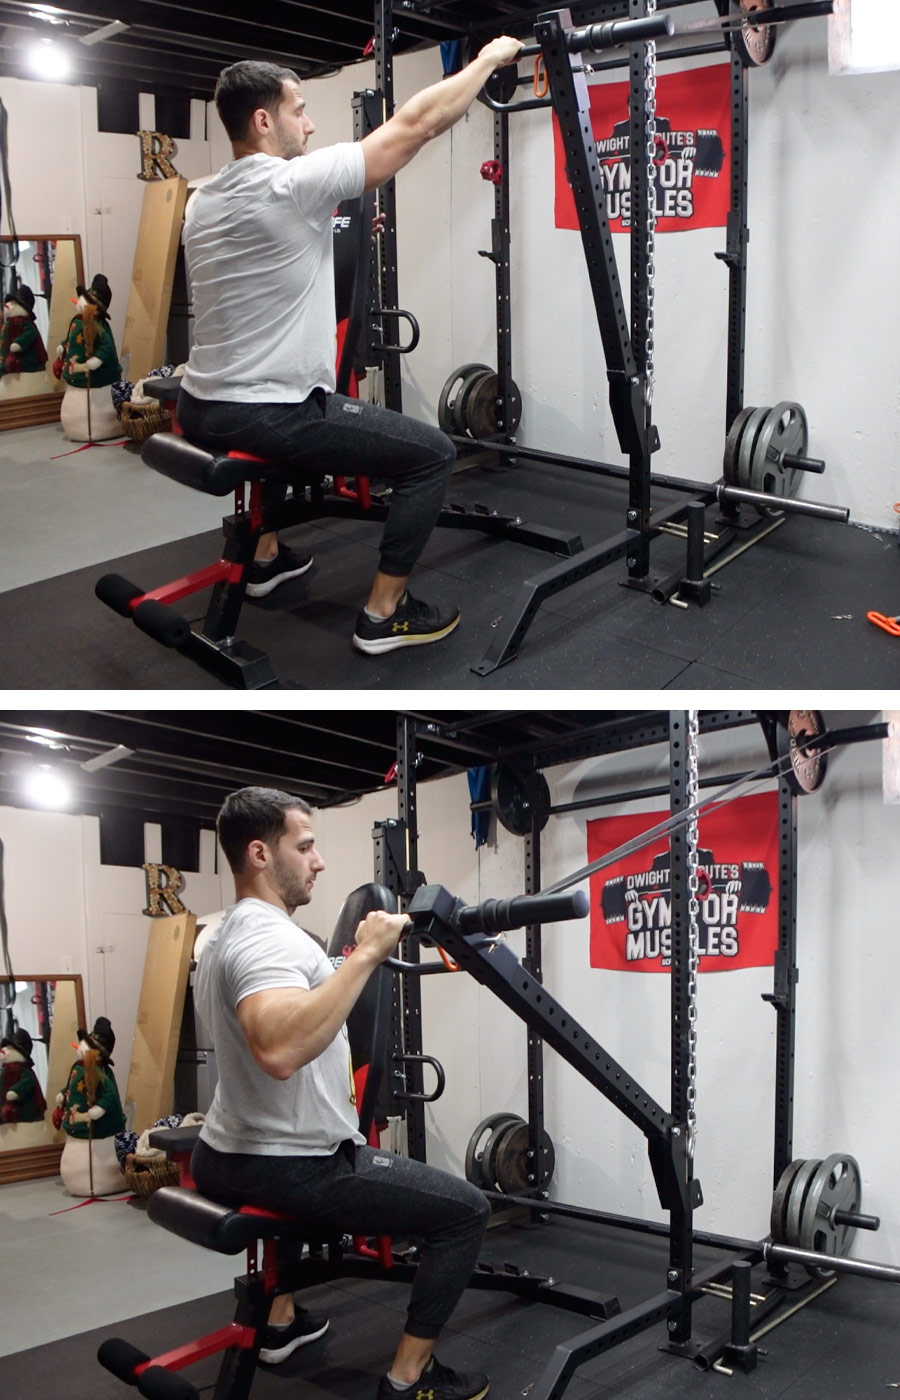
Seated high rows with lever arms require a bit of creativity- that’s when resistance bands come in handy.
When I first started working out at home, I only had resistance bands, so I learned a ton about what they can do.
Since I have regular equipment now, I don’t use resistance bands nearly as much, but they are still incredibly useful.
For these high rows, we’re using resistance bands instead of weight plates to create resistance. This is because there is no way to create this range of motion with weights since we want the lever arms to pull in the opposite direction of gravity.
Loop a resistance band around the lever arm and attach it to a weight peg of the back of the rack. When you pull, the resistance band will act as the weight! Add as many resistance bands as needed to make this challenging for you, but please remember to make sure your rack is stable before attempting these.
Chest Supported Rows
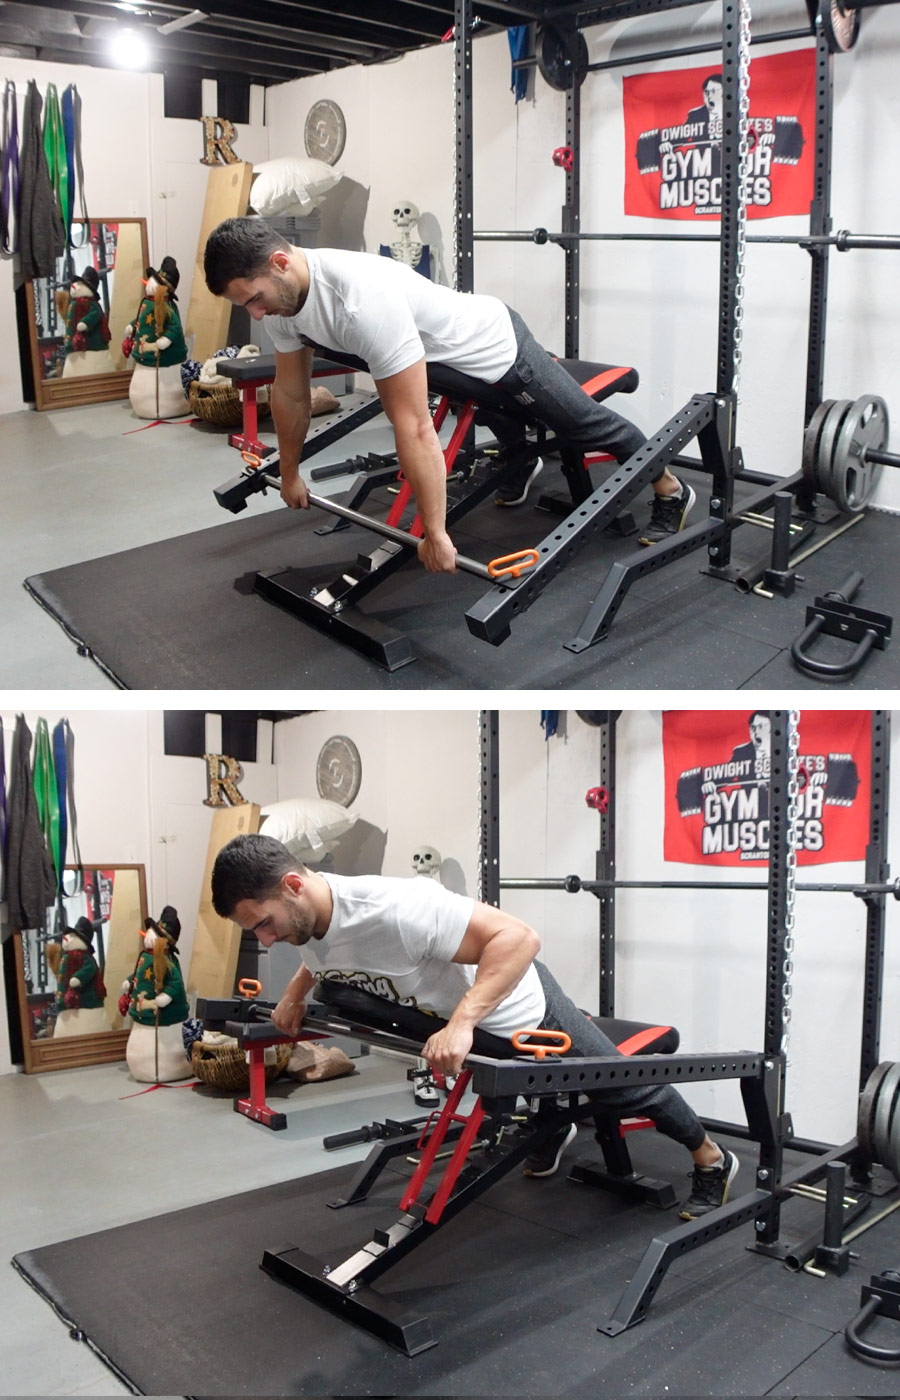
If you do not have a bar for your lever arms, these chest-supported rows can be performed with the handles as well.
Position your bench so that when your grab the bar (or handles) it’s in line with your stomach (right above your belly button). When you pull, you want the bar path to be a straight line towards your stomach.
Like any exercise, it may take you a few tries to find the most comfortable starting position, but once you do, these are an incredible exercise to add to your routine.
Shoulder Exercises To Do With Lever Arms
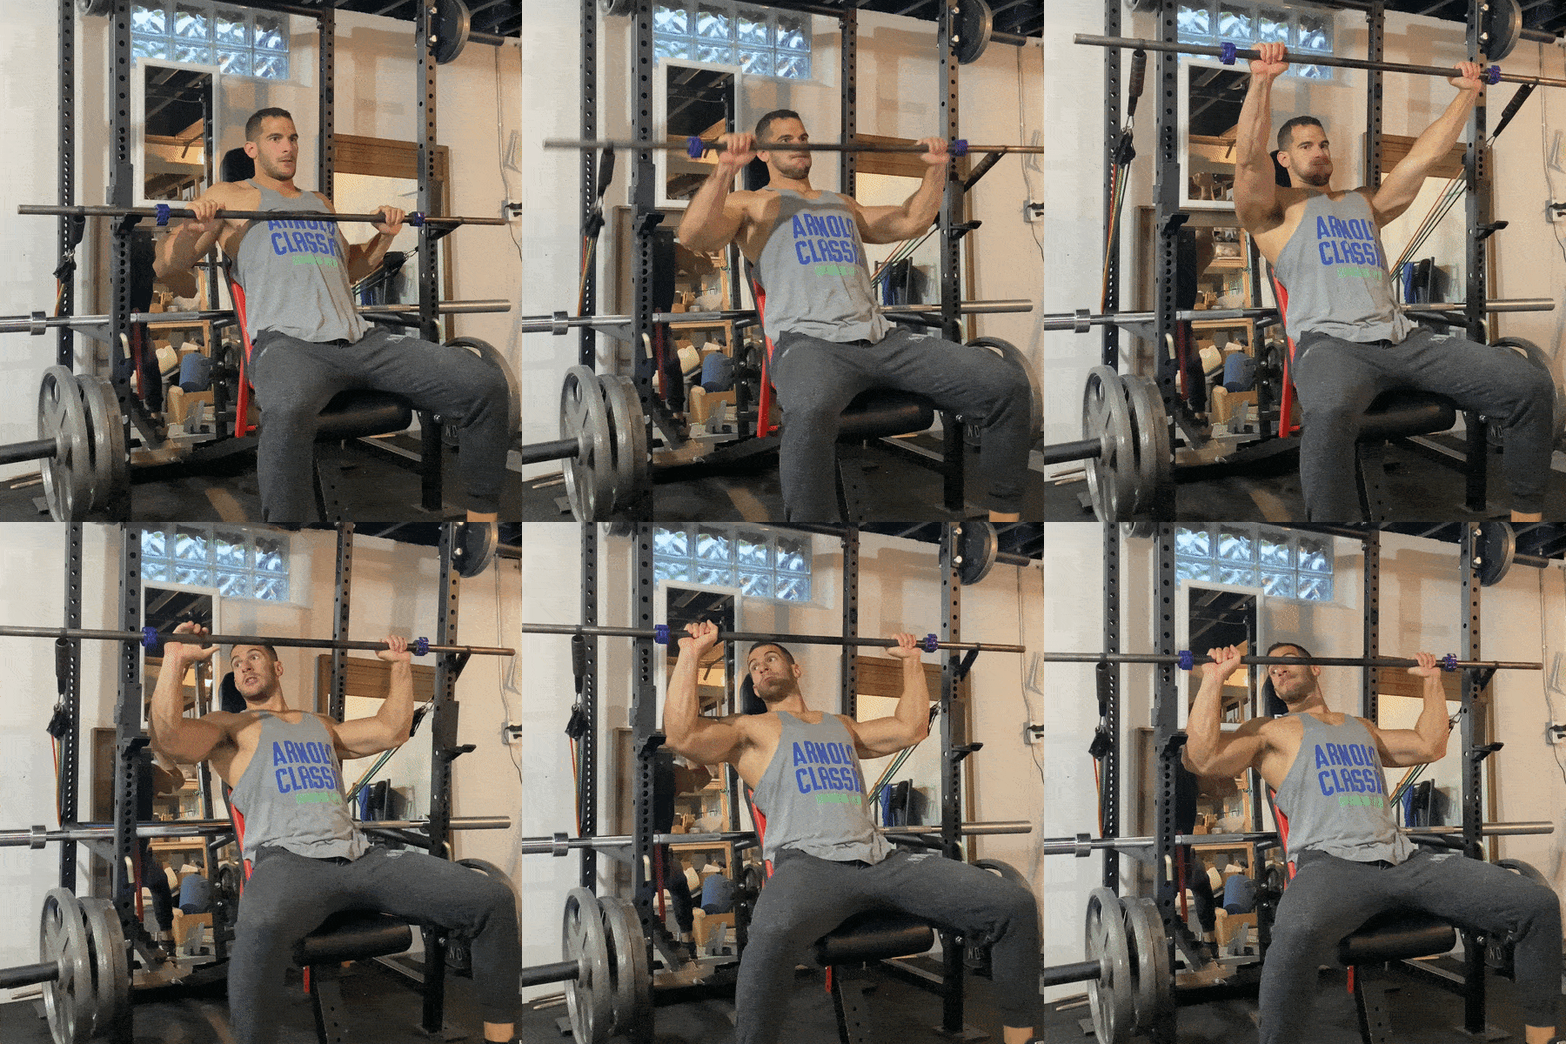
Seated Shoulder Press
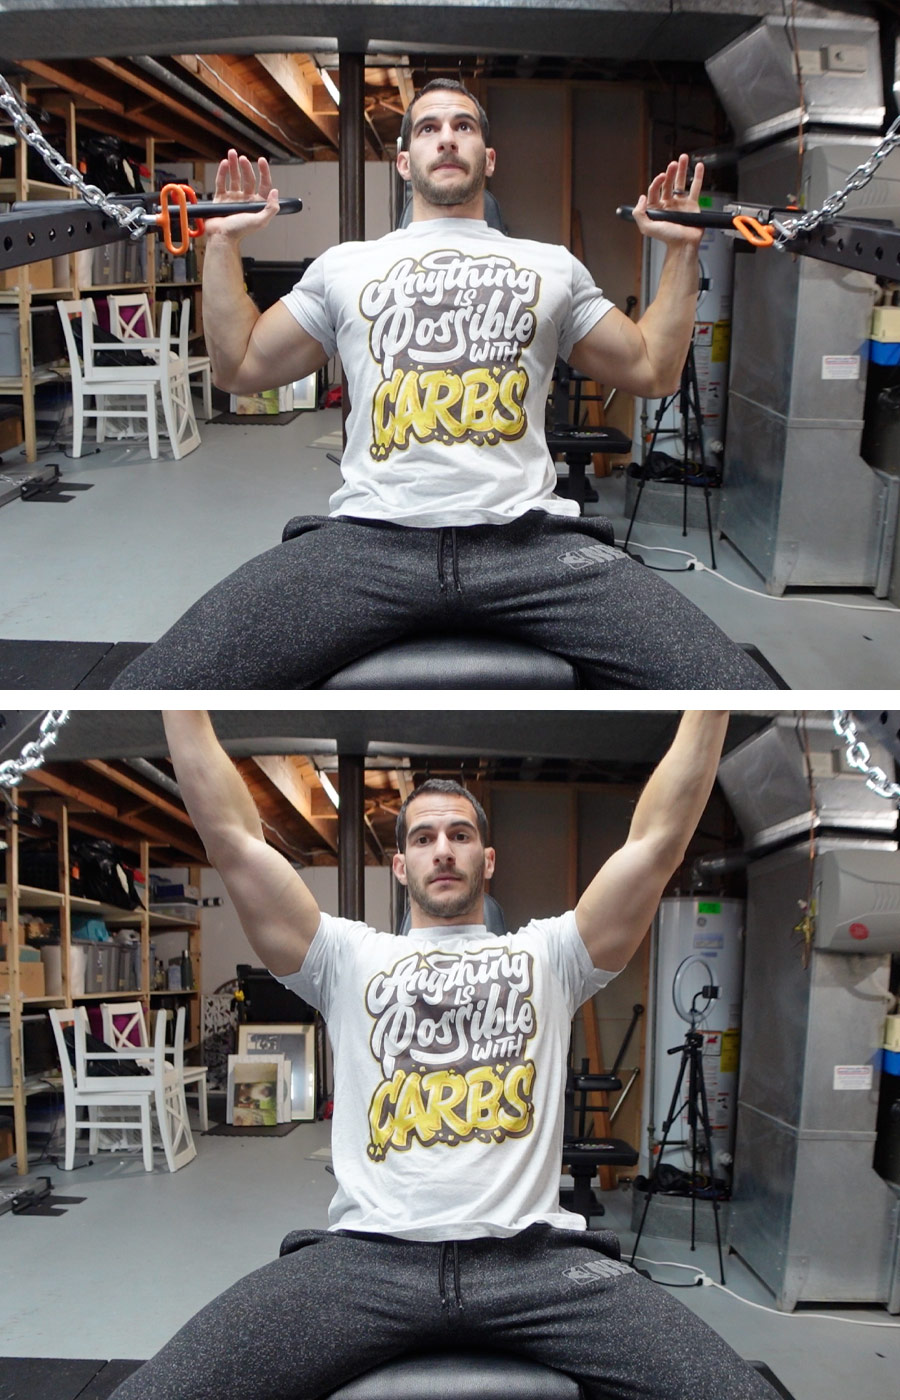
The seated shoulder press can be done with either a bar or the handles, but I like to use the handles because it closely mimics the shoulder press machines in the gym.
Position the arms using your chains so they are at a comfortable starting position around shoulder height, then press straight up.
Standing Lateral Raise
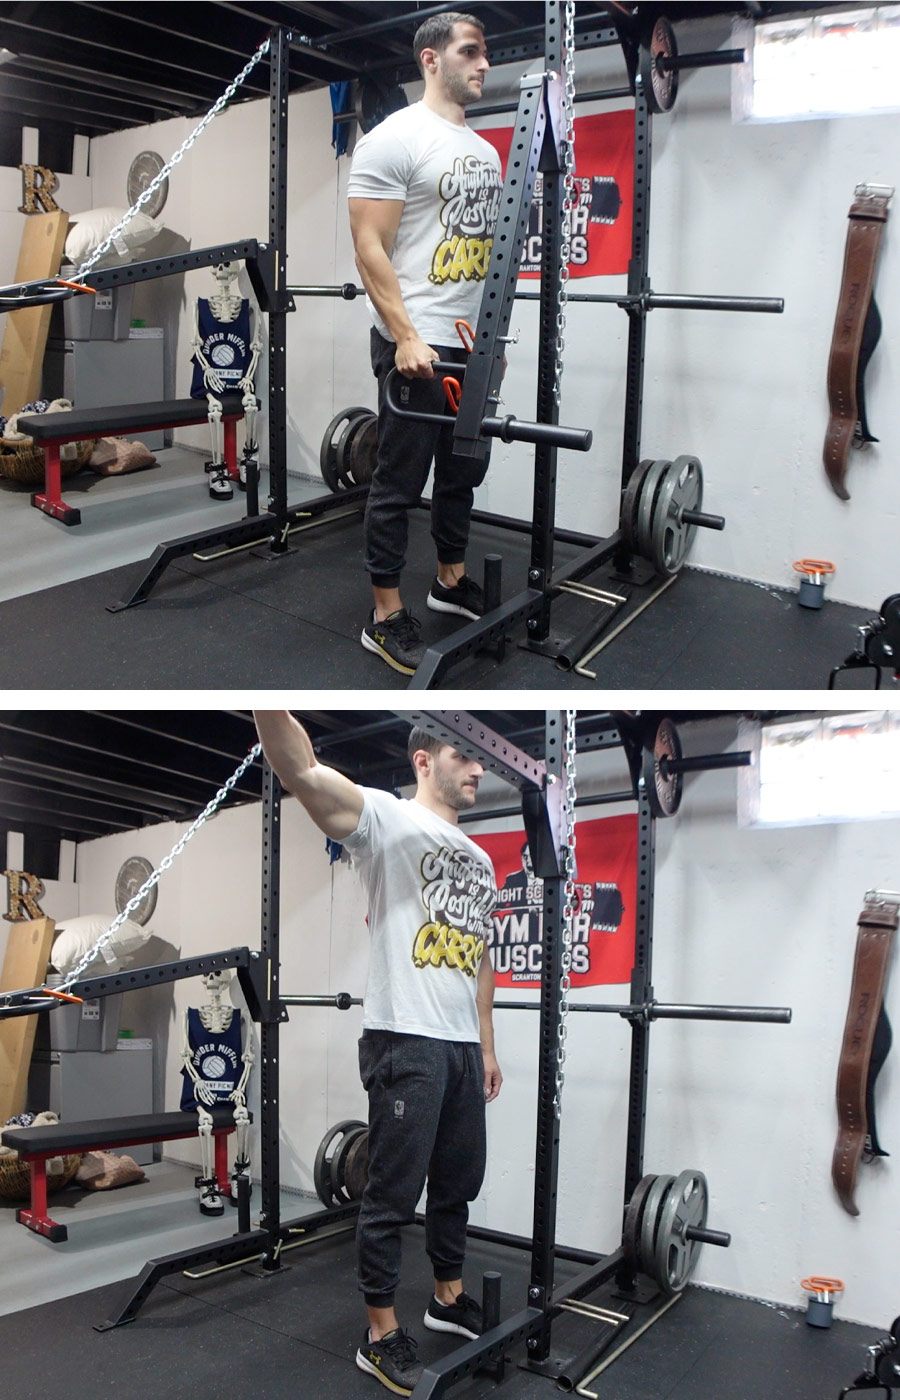
Lateral raises may not be comfortable for you depending on your height, but for me, these work great.
If your arms are significantly shorter than the lever arm (or longer) you may have a tough time.
Position the lever arms so the handle is at your hip, take a step away from the rack (so the arm is slightly away from the rack) and raise the arm out away from your side.
Standing Front Raise
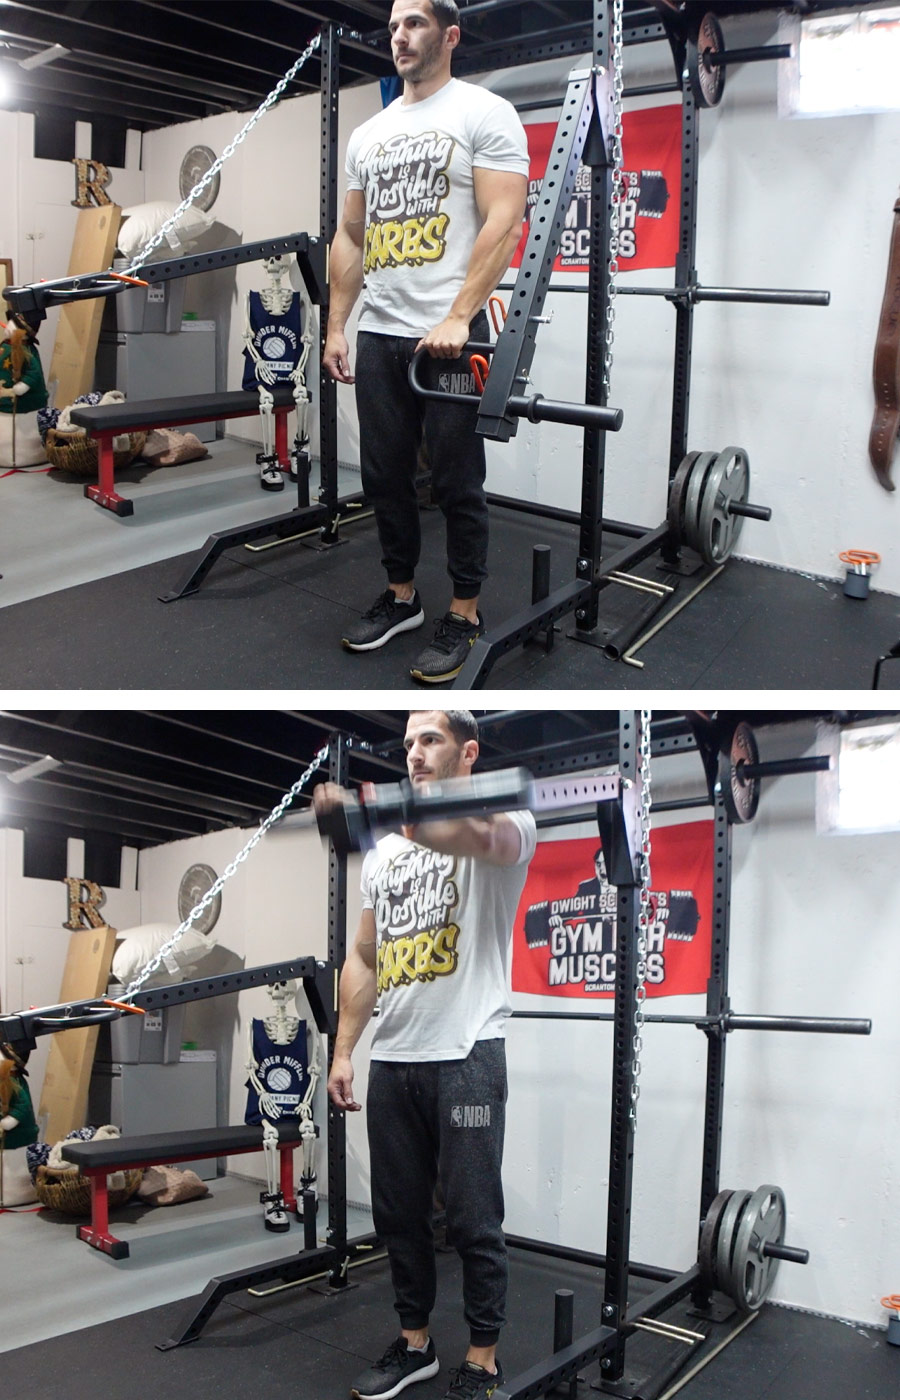
Just like the lateral raise, the front raise may not be comfortable for you if you are very short or very tall, but it’s worth a try!
Grab the handle at hip height and take one big step forward. Keeping your arm straight (technically there’s a slight bend to your elbow) raise the lever arm out directly in front of you.
Single Arm Push Press
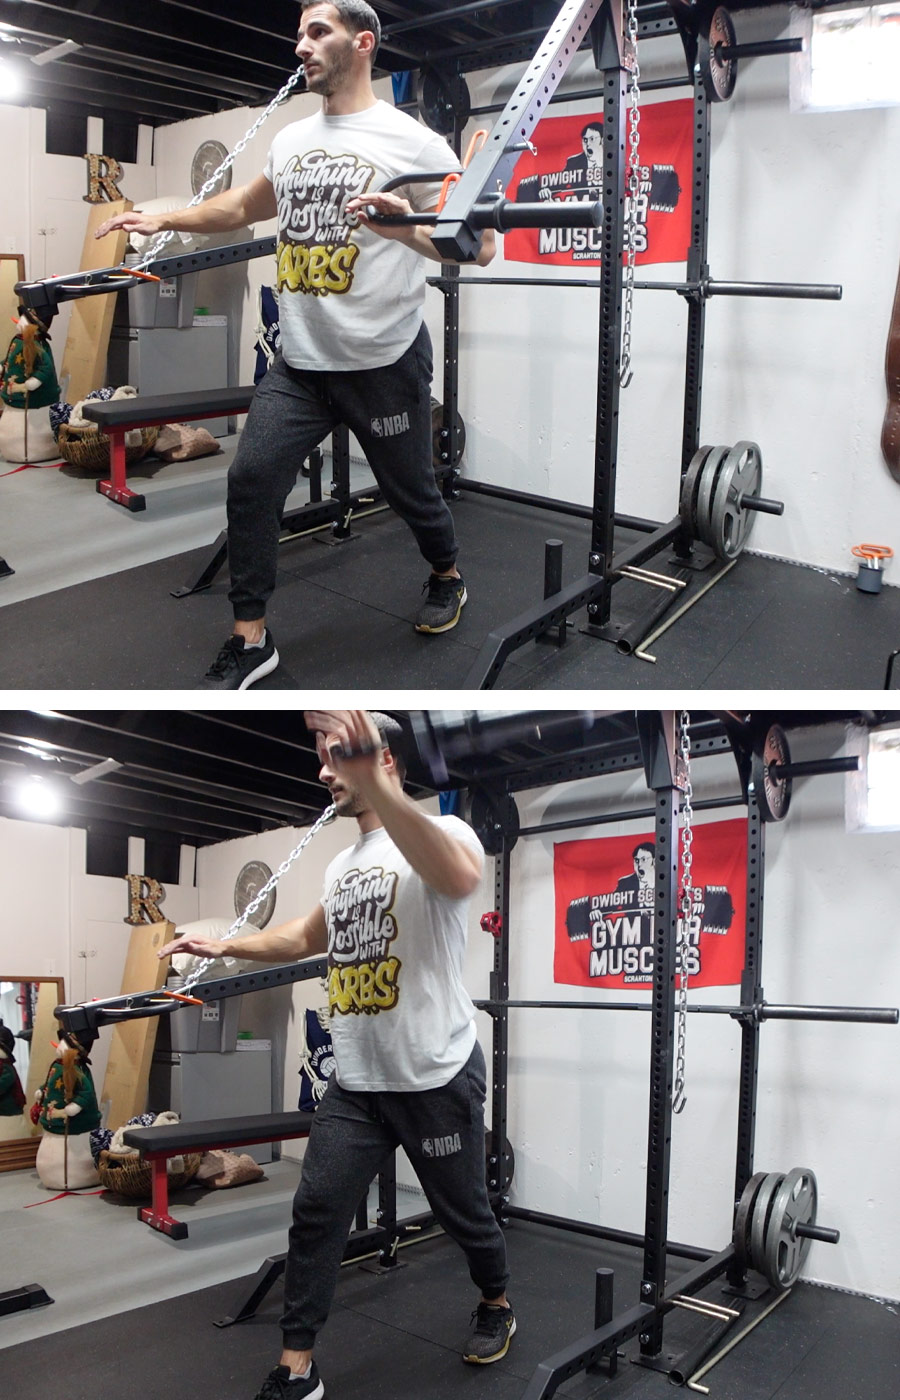
This push press is great to work on explosiveness, but you have to be conscious of your setup. With my rack being in the basement with a low ceiling, I can’t perform these safely.
But if your setup allows it, step out from your rack with the lever arm so the handle begins in front of your shoulder. Explosively press away from your body, using a slight bend of your knees to assist with the movement.
If you want to keep the movement strict, you can also perform a regular standing shoulder press.
Single Arm Barbell Shoulder Press
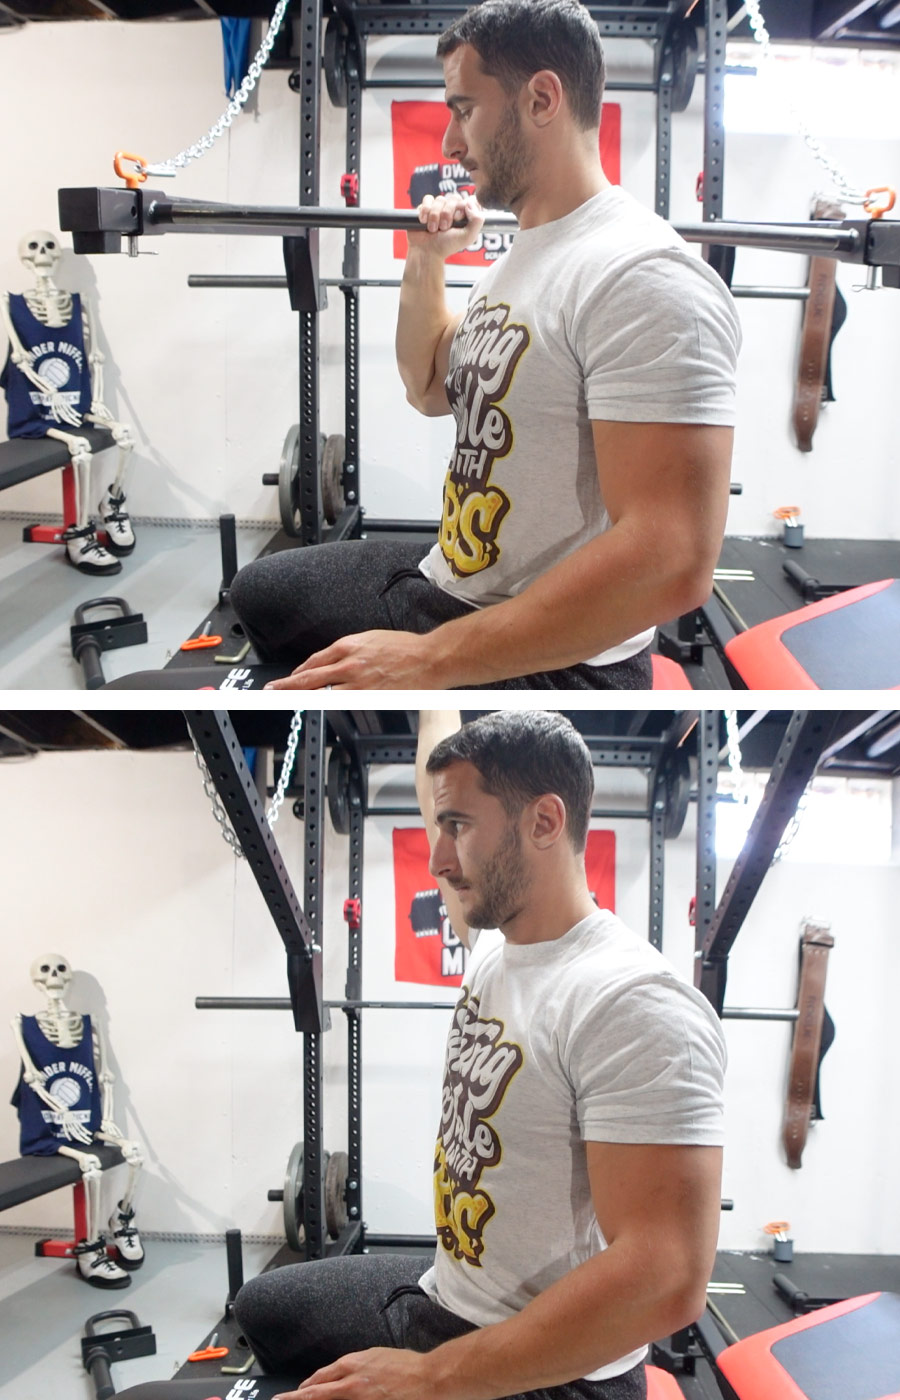
In the gym, one of my go-to shoulder exercises was the single-arm barbell press in a smith machine.
Position a flat bench so it runs parallel with the bar. Face sideways so the bar runs across your shoulder, then hold the bar directly in the center to perform shoulder presses.
This may be very similar to a seated shoulder press, but since the weight is distributed much differently, you’re going to feel it much differently.
Shrugs
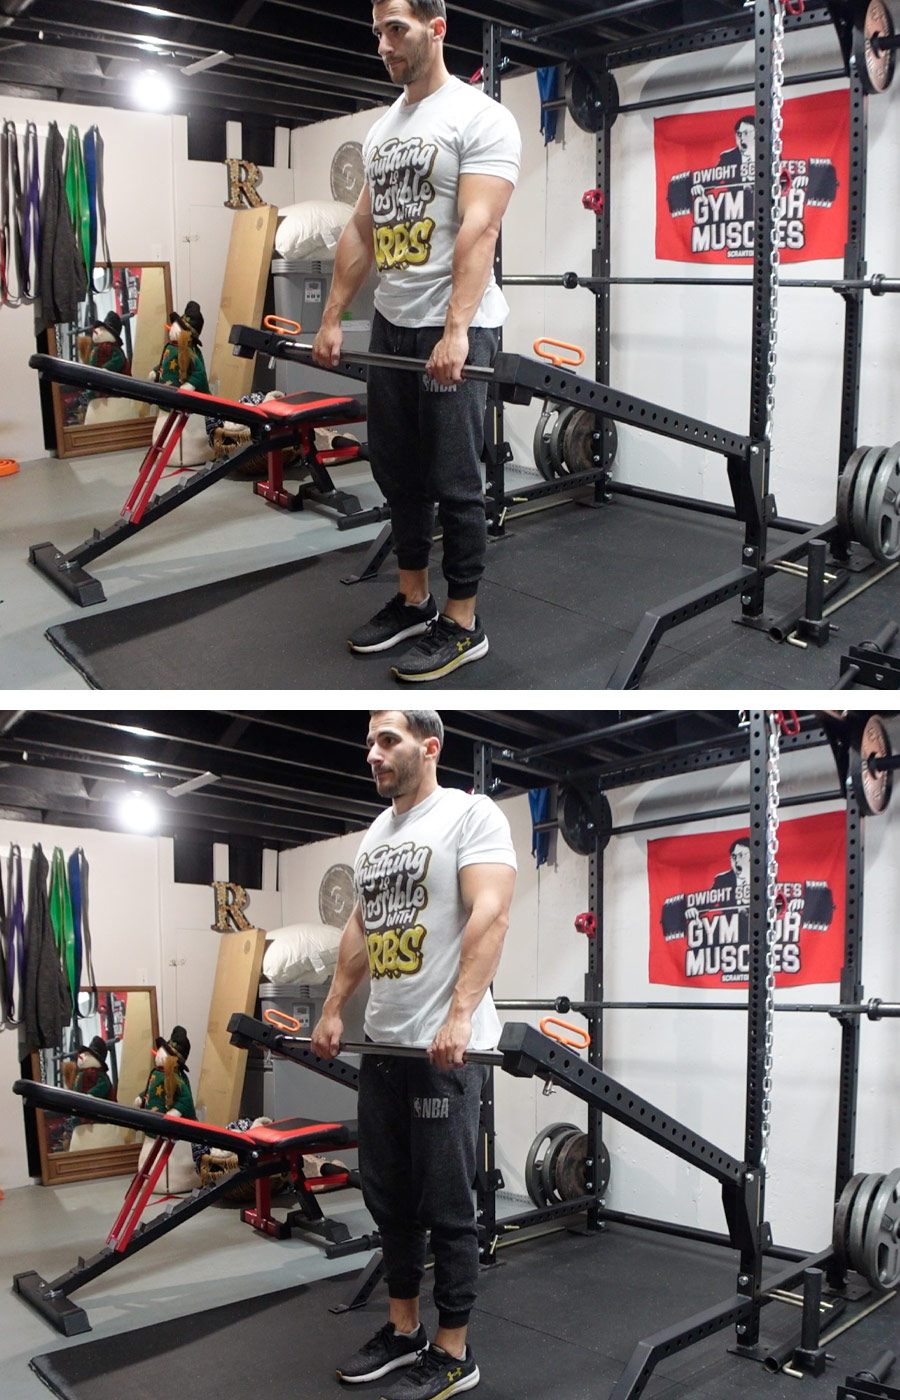
Shrugs are a self-explanatory exercise, and they can be done either with the bar or with single handles.
It’s worth noting that you should not roll your shoulders when you shrug. Instead, it should just be one straight line. Keep your head straight and pull up and slightly back so your shoulders raise up behind your head. If you raise straight up, you can put a ton of extra strain on your neck, and going slightly backwards is going to be much more of a natural range of motion.
Leg Exercises To Do With Lever Arms
Vertical Leg Press

If you have a leg press attachment, like this one from Titan, then you get bonus points.
I only have a bar, but it works for me. If you’re in the same boat as I am, just make sure you perform this leg press with shoes on, or else your feet will definitely slip off the bar.
My camera skills are sub-par, so I apologize for being completely cut off in the photo above, but you should get a general idea!
Lay on the ground (you can do this on a flat bench as well) and get into a position where the bar is directly above you. With your feet slightly wider than shoulder-width, press directly upward.
If you’ve never performed a vertical leg press, it may take some getting used to, but it’s a great variation of a typical leg press.
Leg Press

Lever arms are a great way to perform a classic leg press, especially if you happen to have a foot plate attachment.
I like to do these on the ground, but you can also lay on a bench if you find it to be more comfortable.
Position the lever arms so that the weight starts in a comfortable position, then press out away from the rack. When you press, the lever arms will move up with your feet ending in a position higher than your knees. This should be the most natural range of motion.
Hack Squat

This hack squat was a late addition to this list because I didn’t think it would work out well, but it is officially one of my favorite uses of the lever arms!
As always, please make sure your rack is stable before performing these.
It may take some experimenting to find the perfect standing position (I recommend viewing the video to see how I set mine up) but this will create a very similar motion to a traditional hack squat.
Keeping your feet out in front of you (about one foot or so) perform a squat while leaning back into the bar. Having your feet out in front of you will shift the emphasis a bit more to your quads and really challenge you.
Since I don’t want to push the limits of my rack, I like to keep these lighter with the reps high (for reference, I’ll put 70 pounds on each side). Performing these at the end of your leg day is a great finisher.
Goblet Squats

You may have performed a goblet squat with a kettlebell or dumbbell before, but the lever arms also work great for them.
Grab the lever arm up close to your chest, then perform a squat while holding the arm in that position throughout the movement.
Belt Squats

Belt squats are an incredible squat variation for anyone with back issues. When the weight is around your waist, it takes all of the stress off of your shoulders and back, creating a much safer squat if you deal with injuries.
I purchased this belt off Amazon originally for weighted pullups, but it works great for belt squats.
Hook the chain around a hitch pin on the lever arm, then perform a squat while keeping your back upright.
If you have something to hold onto to help keep your back upright, that would be very helpful, but I like to just keep my arms out in front of me to ensure I don’t end up leaning too far forward.
Glute Kickbacks

Keeping your body at 90 degrees (ish) you can perform single-leg glute kickbacks with your lever arms.
Start with the handle just above ankle height, then kick back and up so the weight ends in line with your glutes.
Standing Calf Raises
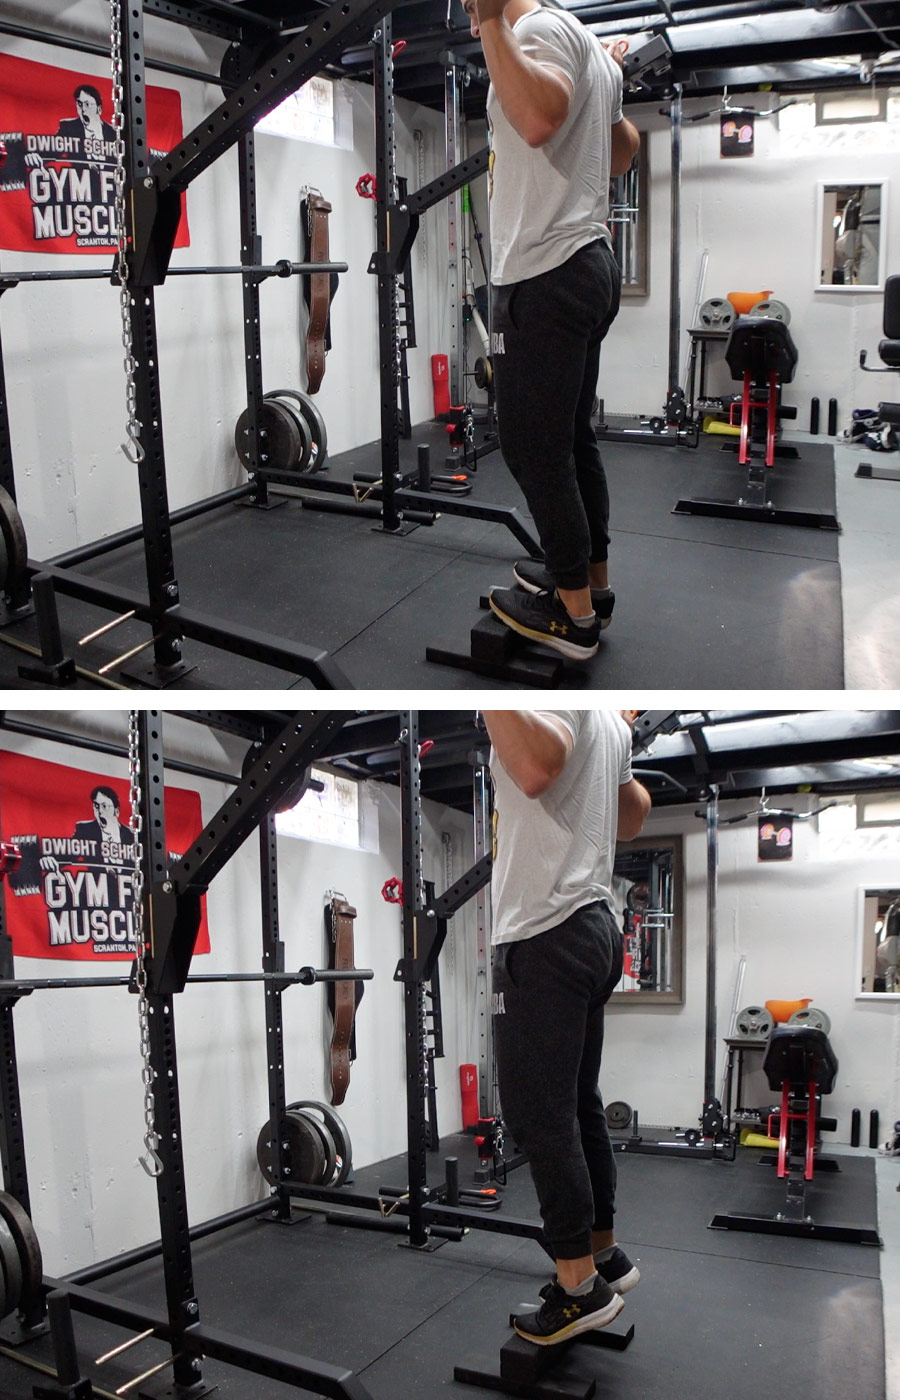
Using a smith machine for standing calf raises was always one of my favorite things to do in the gym, so I was thrilled to learn that I could do calf raises with my lever arms.
Using a block, step, brick, book, or anything else you can use to create some elevation, position the bar across your shoulders and push through your toes to lift your heels up.
Donkey Calf Raises
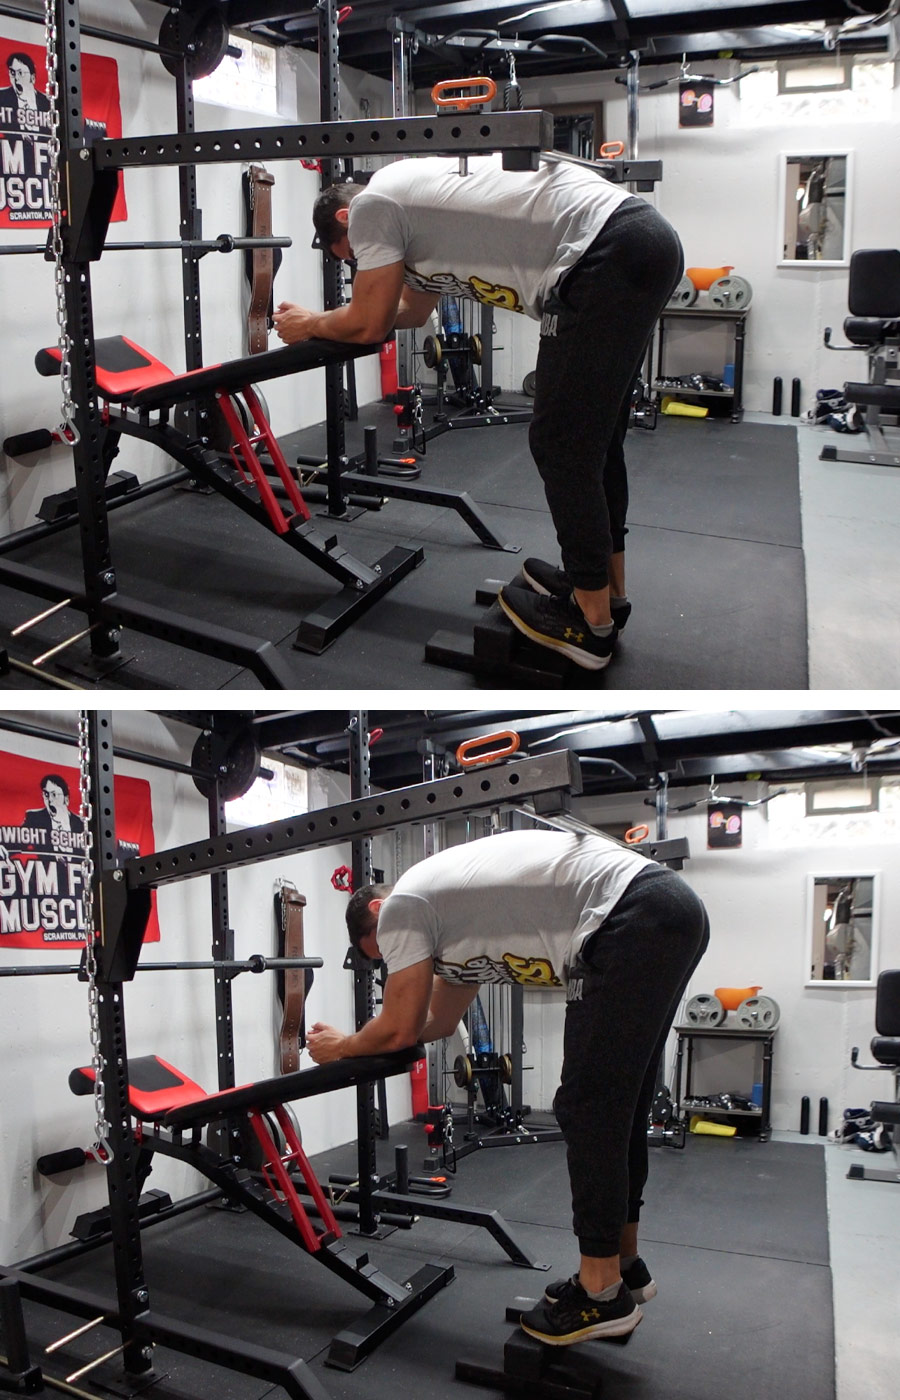
Not many people know about donkey calf raises because the machines are not incredibly common in gyms, but it’s an old-school exercise that deserves some love.
Bend over so you can position the weight across your back, and grab onto a bench, chair, or rack to keep your body stable.
With your body at 90 degrees, perform calf raises.
Since your body is bent and your hamstrings are elongated, you’ll feel an incredible stretch in your calves.
Seated Calf Raises
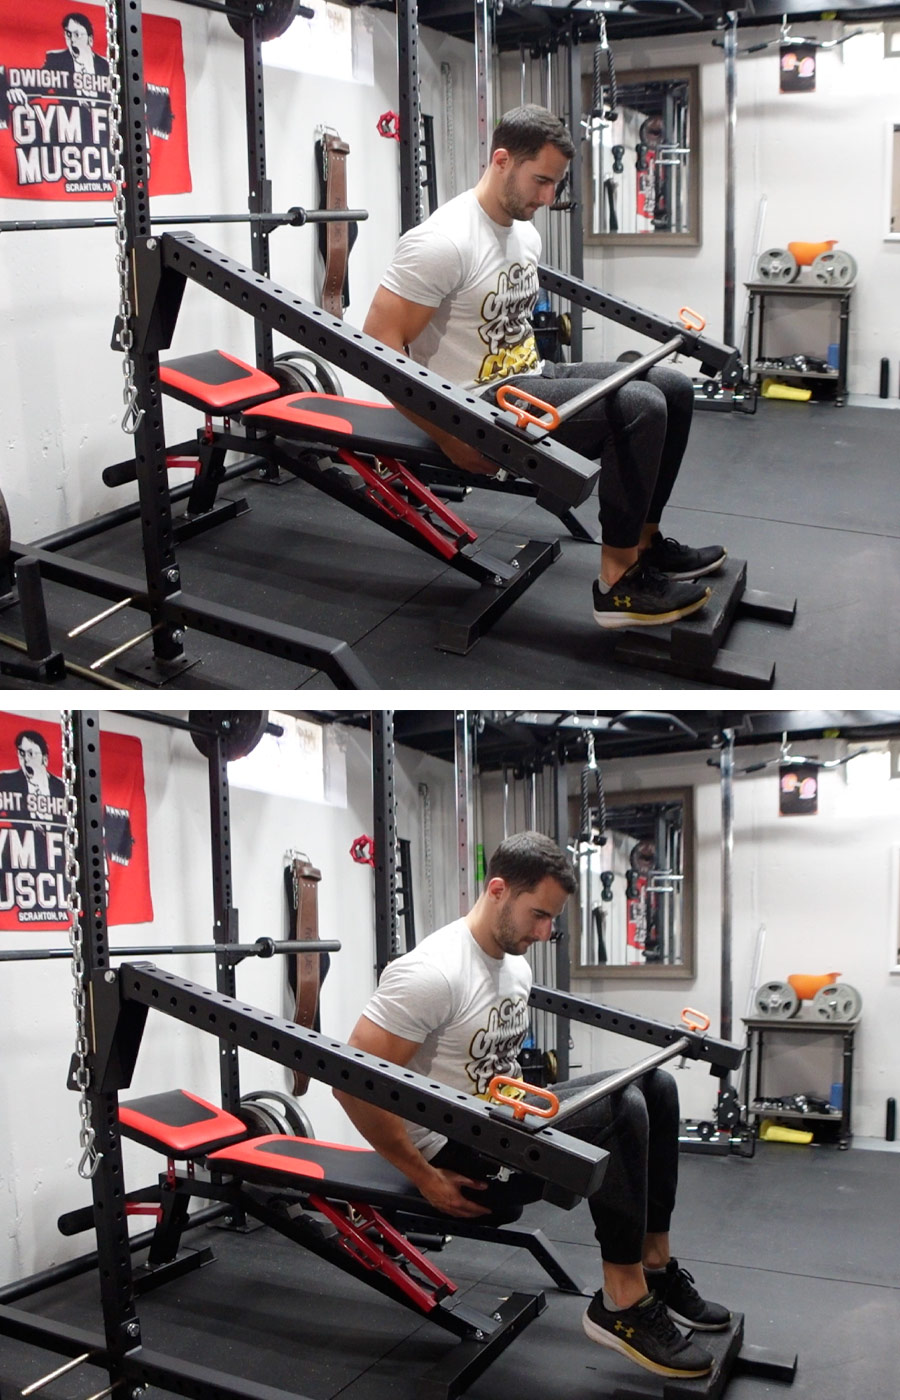
Seated calf raises are also a great exercise to perform with your lever arms.
You may need to prop your butt up to get into a comfortable starting position if your bench is low, but once you are in position, you can perform seated calf raises with the bar across the top of your knees.
If you find this uncomfortable, you can use a yoga mat or squat pad to cushion the bar on your legs.
Romanian Deadlifts
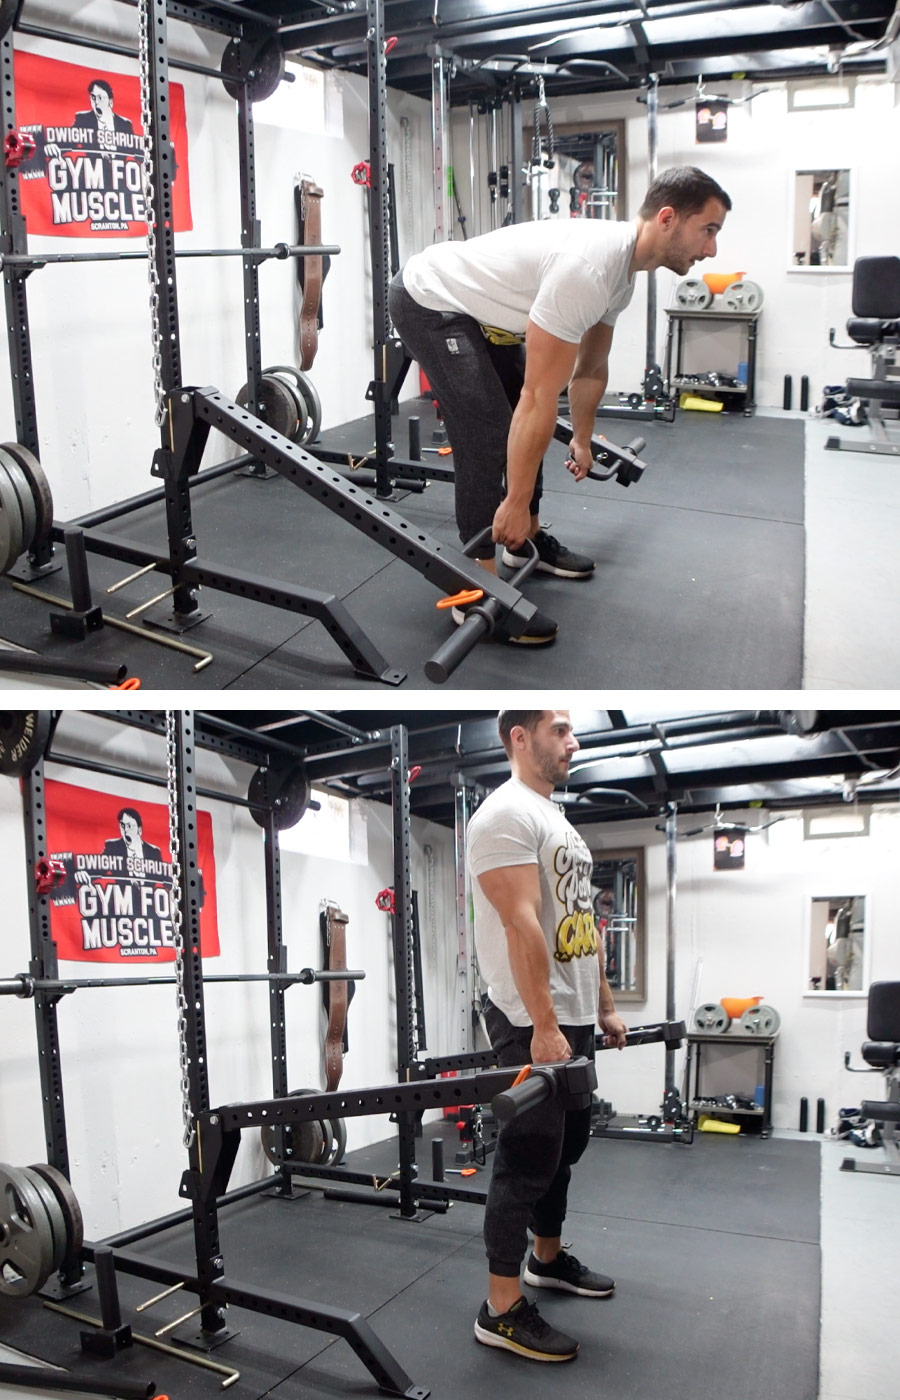
One of the best exercises for hamstring development is Romanian Deadlifts.
The setup is going to be very similar to a traditional deadlift, but you’re going to keep your legs stationary with a slight bend in your knee throughout the movement. With a traditional deadlift you are bending your knees to pick the weight up off the floor, but with the RDL you are keeping your legs still and hinging at your hips.
Barbell Stiff-Legged Deadlifts

A stiff-legged deadlift is nearly identical to the Romanian Deadlift, but there is a slight difference.
With the RDL, you are bending your knees slightly throughout. With a stiff-legged deadlift, your legs are straight until you get to the bottom of the motion (maximum stretch) and you give a slight bend to your knees there.
Frankly, they are incredibly similar exercises, and if you’re new to lifting, you don’t really need to worry about the exact differences.
The only real difference to note here is that we are using a barbell, vs the previous exercise where we used the handles.
Deadlifts

When you perform deadlifts using the lever arms, it is very similar to using a “trap bar” in the gym. A trap bar is that bar that is shaped like a hexagon, allowing your to stand inside of it while performing deadlifts or shrugs.
With the lever arms, it’s going to be a very similar movement.
Bend down with your back straight and your head up, grab the handles, then explode up.
Arm Exercises To Do With Lever Arms
Standing Bicep Curls
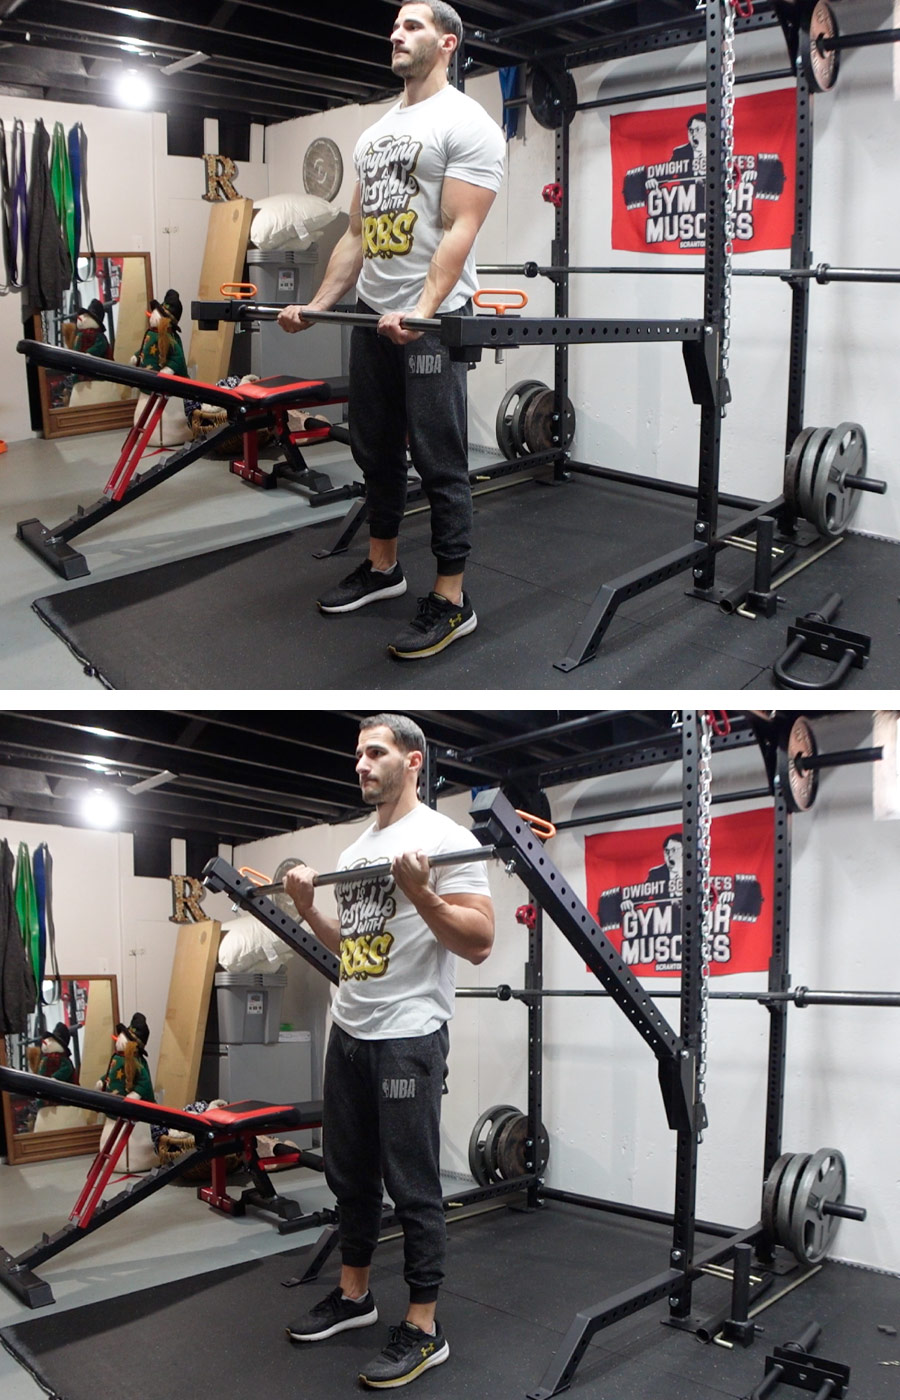
I don’t necessarily recommend using the lever arms for bicep curls, because the range of motion is not very natural.
When you curl, you need the weight to move in a very specific curved motion, and the length of the lever arm makes it difficult to accomplish that.
However, if you are the right height, you can actually perform a bicep curl decently well, although still not 100% ideal.
Stand with the bar at your hips and take a slight step back so your hands are out in front of your body. Curl up, bringing your elbows back very slightly in order to achieve the full range of motion.
With a traditional bicep curl you want to keep your elbows stationary to hinge only at your elbows, but the length of the lever arms might make it difficult to do so.
Skull Crushers
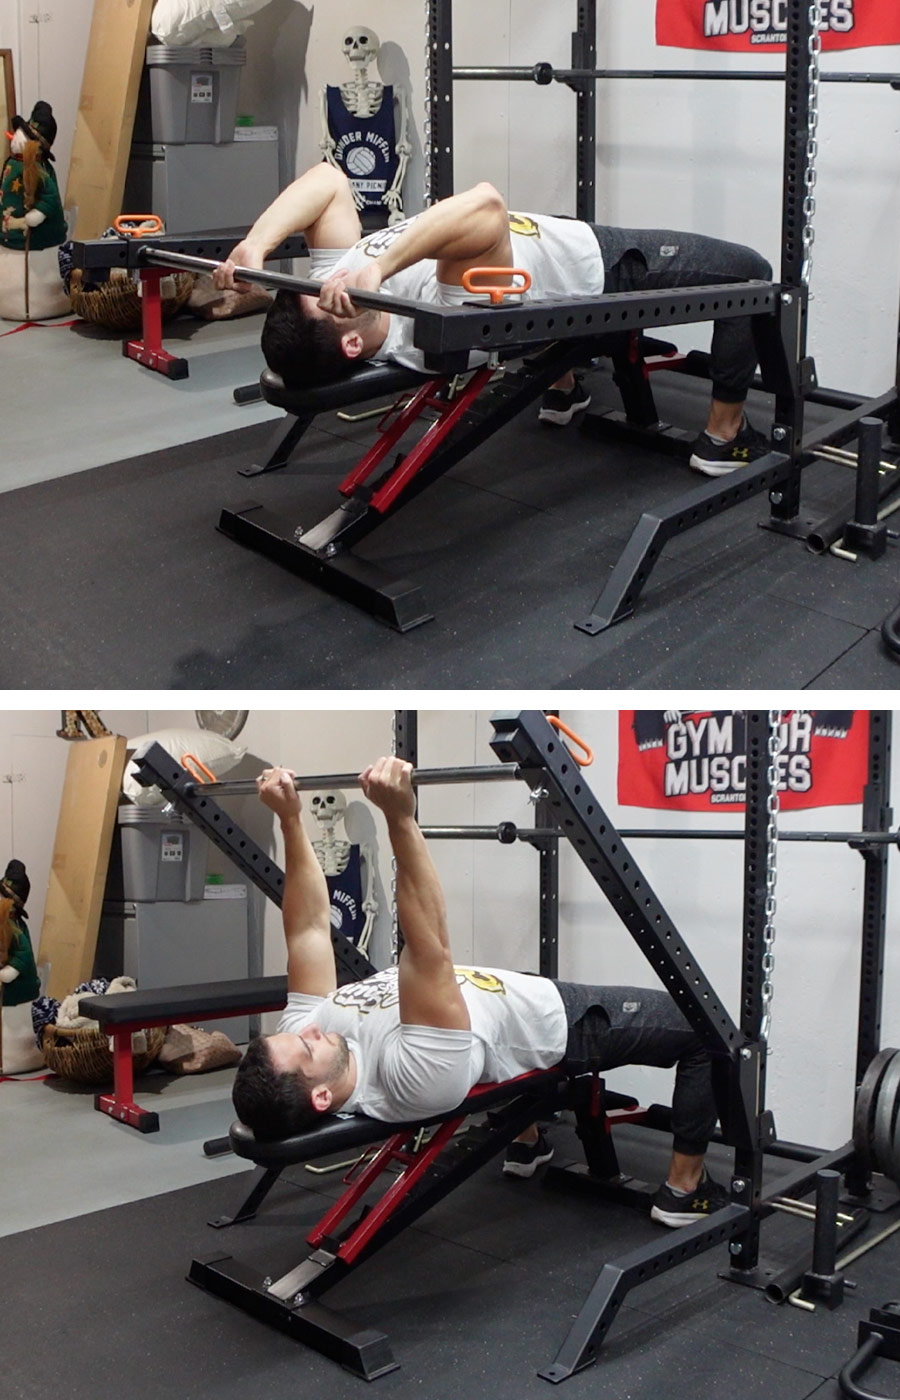
There are likely many different tricep exercises you can perform with lever arms, but the one I have done and recommend is skull crushers.
Lay down on a flat bench and position the lever arms horizontal with your body. Grab the bar right above your forehead, keep your elbows tucked in, and press the weight directly above your head.
Dips & Inverted Rows
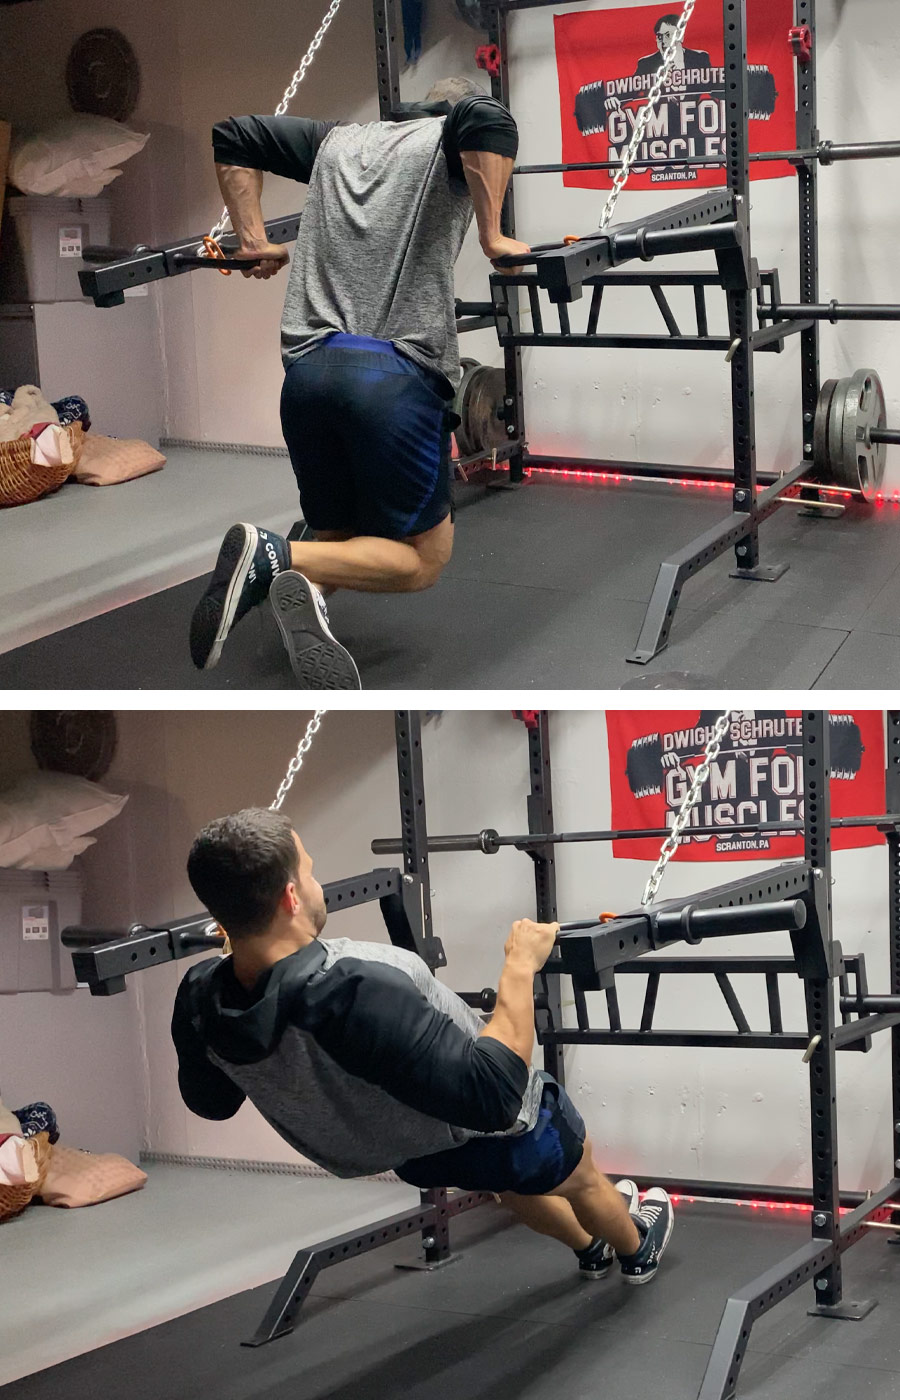
Last but not least, you can get creative by using your lever arms outside of the rack to perform bodyweight exercises!
If there is a bodyweight exercise you enjoy, odds are that you can do it with the lever arms, but these are my two favorites.
Since I do not have a dip attachment for my rack, the lever arms are the perfect use for dips. Use the chains to get the lever arms into a horizontal starting position, then perform dips as you normally would.
With the arms in the same position, you can also perform inverted rows. This is an exercise that you can perform with your racked barbell, but if you like to superset (go back and forth between exercises without rest), this variation can be extremely useful so you can use your barbell for other exercises.
Final Thoughts: Are Lever Arms Necessary For Home Gyms?
If you’ve read through this blog post or checked out my video, it should be pretty clear that lever arms are extremely valuable for home gyms!
When it comes to building your dream home gym setup, we’re often limited by space. While it would be amazing to have a full section of chest & back machines, the reality is that most of us simply cannot do that.
These lever arms allow you to mimic virtually any machine in the gym while taking up no additional space whatsoever.
Of course, it’s not all butterflies and rainbows. Lever arms take time to adjust, especially if you’re working out alone, and you may find yourself wasting a lot of time setting them up. Although, with the Rep Fitness ISO Arms, you’ll eliminate most of the setup time that I deal with.
Also, in some cases, you may find that the exercise movements with lever arms are not 100% ideal.
Don’t run out and buy lever arms thinking that they’re going to be perfect, because that is certainly not the case. But when it comes to home gyms, it’s all about creativity. And with a little creativity, lever arms can be an amazing replacement for most of your favorite machines in the gym!

Great post, quick question. Where did you get the bar for the lever arms?
Thanks!
https://www.bellsofsteel.us/all-products/racks/rack-attachments/adjustable-pullup-bar-rack-attachment If you have lever arms from Titan, they also sell their own pullup bar that you can use